Category Archives: Modification: Locomotives

FR: Swedish L5 Steam Locomotive for the SJ

SJ L5 Steam Locomotive (note: jack-shaft and no cylinders)
FR L5 locomotive and tender pulling SJ coach produced in FR’s regular production schedule

The basis for FR’s steam locomotive L5 for the SJ is a build kit, it is further a kit reliant on using one of Marklin’s class 74’s for the frame and drive mechanism. What is included in the kit are all parts to for building the locomotive body and tender thus installed on a Marklin class 74 chassis.

FR Item #46.140.91 Build Kit for SJ’s L5 loco

I started this project a while ago, but it and this blog went fishing due in part to the upsets in 2020 we all shared. I include this post as the finished follow-up to my earlier post about this kit. The “Do’s and Don’ts” are important for other build kits of this nature, I hope to track some of the key areas which may in kind translate from this rather obscure kit to other kits likewise designed: cast metal parts, nickel silver parts, cast plastic parts and wiring modifications. Hope this helps my friends in Z.

FR sample photo

Step 1 (purchase): the kit arrives with parts and instructions in a hard plastic shell, it costs about $100, maybe more since it is out of production as most FR items quickly gain that status. Building the kit requires bending metal parts, soldering metal parts, gluing, painting and wiring. In all the project took a day which spilled over to another thus it took me approximately 12 hours. Although the instructions help they do not substitute for one’s own practical evaluation of what needs to be done.

FR Instruction Sheet Reference Photo

Step 2 (painful): choosing the Marklin class 74 loco to sacrifice. The prototype L5 had black wheels thus there are just two Marklin’s which can be used without painting the wheel sets, I chose 88956 with black wheels.

Marklin Class 74 chassis and shell framing FR’s L5 in center of photo
Marklin Class 74 with characteristic red wheels most often found on this class loco in Mini-Club
Marklin Class 74’s shell is entirely cast whereas the FR kit features a cast boiler only

Step 3: building the loco cabin and tender comprise nickel silver parts which readily solder, but add-on parts including railings and steps are stainless steel which normally require special solder in this case I glued on the stainless steel add-on’s with 5 minute epoxy using care in only applying small drops as needed. Curved cabin roof is another challenge here, I found the thick metal hard to bend around a small dowel, but it eventually ceded with the help of a pliant hard foam surface. “The Bug” bending tool worked great for producing the cap on the cabin as well as the bend on the smoke deflectors.

FR L5 shell before application of decals

Step 4: tender frame and wheel sets is one of the more easy procedures this far, it includes bending a nickel silver frame to hold 3 pairs of wheels. Plastic cast truck details are glued onto the frame after using a Dremel tool to smooth the edges. Note: I used 5 minute epoxy sparingly and not near to axle holes for the wheels: don’t want to glue the wheels in place, they need to spin freely (double check). A circuit board with pick-ups secures to a weight inside the tender which is also secured to the frame with a screw. Pick-ups must engage with inner sides of wheels as they will carry electricity to the motor in the loco. Finally wires are soldered to each side of circuit board as they will eventually be soldered to brushes in the loco.

FR L5 Tender with wires protruding later soldered to motor pick-ups in loco

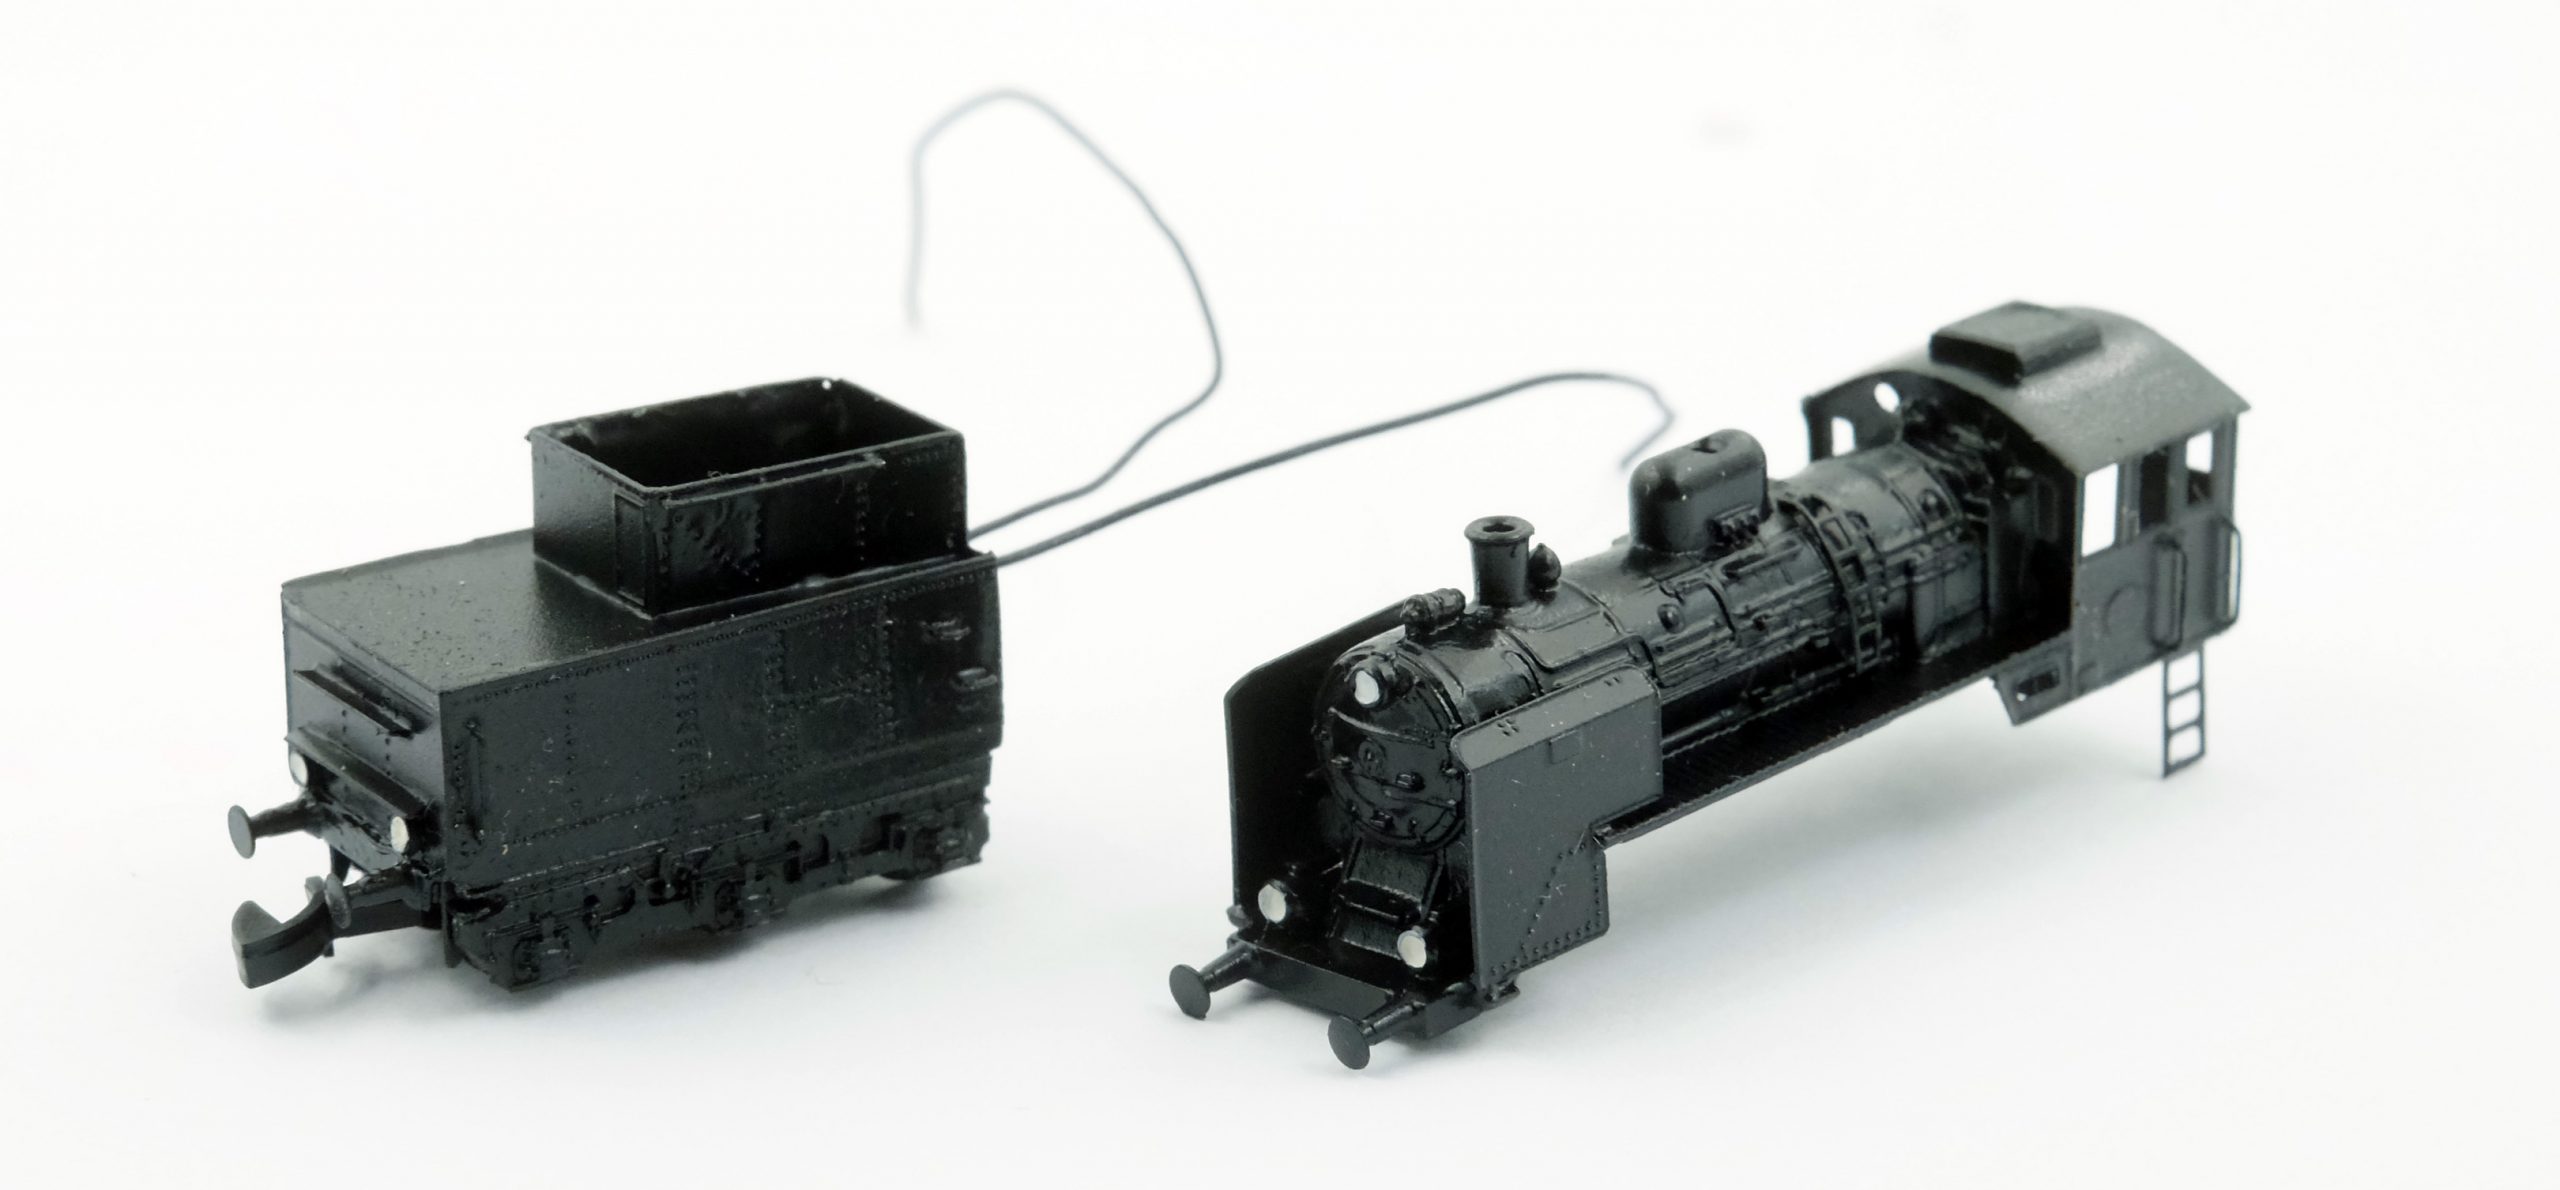
Step 5: assembly of locomotive includes attaching cabin, boiler and smoke deflectors. Note: cast boiler is the main part and cannot be soldered!!!!!! Don’t melt the boiler instead glue on the cabin, smoke deflectors and ladder with 5 minute epoxy.

Cabin with add-on parts including ladders and railings. Note: stainless steel add-on parts can be glued with 5 minute epoxy otherwise solder formulated for stainless steel is required. Cabin includes a rounded roof which is molded around a small dowel. Note: solder is only applied to cabin with remaining cabin parts glued with 5 minute epoxy.

Step 6: time to paint is best done with airbrush and water soluble airbrush paints, but first gently wash all parts in a dilute solution of blue Dawn and allow to dry. I chose Vallejo #70.950 Black which is a deep black. I would recommend priming first which I did not do thus my paint may not be as strong as it should be primarily on the boiler other parts the paint is strong without primer. Paper loco plaques are cut out and glued to the oval indents on cabin housing while SJ logo is dry transfer. A clear lacquer is finally applied to protect the finish.

I rendered the headlamps only, but there is the possibility drilling out the headlamps and utilizing LED module. The downside to lighting the loco is difficulty masking this shell.

Step 7: FR’s kit installed on Marklin chassis is fairly uncomplicated, but this step may rely on the use of a Dremel tool with grinding wheel. First: modifying the chassis for better prototypical appearance: remove cylinders which are clipped onto frame. Note: L5 prototype utilized a jackshaft attached to the side rods thus simplifying the appearance includes removing the cylinders and side rods formerly engaged with cylinders. Note: instructions show a 2 armed jackshaft leading from the center wheel, I opted to not install a jackshaft because I could not grasp how it attached to frame, it also appeared to be problematic for running the loco. With a razor blade carefully cut away leading heat point on front coupler and remove coupler and spring. You will notice much less room within the FR loco shell compared with the former Marklin shell thus some modification of the shell is needed to allow the two to come together. After locating the included brass bushing install it within the Marklin chassis which coincides with the steam dome, it will turn into place leaving 1/8th – 3/16’s of an inch protruding to make contact with screw thru steam dome securing loco shell to chassis.

Marklin unmodified chassis for #88956 showing cylinders which will be removed.
Completed FR L5 kit without installation of jack-shaft. Note: wiring includes pick-ups in tender with wires soldered to motor brushes in loco thereby adding 6 additional wheels to pick-up electricity for the motor.

Marklin Z Tank Loco 8895: evolution of design

photo: courtesy Marklin
Marklin 8895 (2000-2006) German Federal Railroad (DB) class 74 tank locomotive. Era III.

Almost 20 years since the 8895 (2000-2006) debuted featuring the relatively new 5 pole mini-club motor (1998) with 7 variations in between.

Tank locomotives are smart steam locomotives featuring water tanks mounted alongside the boiler with coal bunker located behind cab. A few early example tank locomotives featured a coal hopper above cab and worked with gravity to self feed the system which for one man operation was ideal or at least manageable on small railroads. For a whole host of reasons the tank locomotive was the smart choice for economical and efficient operation for commuter traffic and the like.

The evolution of this locomotive class modeled in Z includes notable examples of various railroads and era’s. Plus of course increased detailing of locomotive’s running gear and side rods. An overlooked increase in side rod movement of Marklin’s new steam locomotives is a complex detail feature much improved from earlier examples. Thus far this locomotive has not been built with a brush-less motor, but the future seems just around the corner for what comes next.

Marklin 88951 (2003-2004) Deutsche Reichsbahn-Gesellschaft (DRG) class 74 (operating number 74 690). Era II.
Marklin 88951 (2003-2004) Deutsche Reichsbahn-Gesellschaft (DRG) class 74 (Era II) with destination boards: “Wannsee.”
Marklin 88952 (One Time Series-2005) Royal Wurttemberg State Railways (K.W.St.E) class T 9. Era I. Note: modified from delivery with added pick-ups connected to wheels of coach thus electric is picked up from wheels of locomotive plus 4 wheels on coach: benefits traveling through turn-outs with dips in electric flow.
Marklin 88952 (One Time Series-2005) Royal Wurttemberg State Railways (K.W.St.E) class T 9 (Era I) with Faller laser-cut building “Quakenbruck Town Hall” (282774) in background

Note: Marklin’s 2005 release of 88952 celebrated “200 Years of the Kingdom of Wurttemberg”

Marklin 88953 (One Time Series-2015) class 74 painted and lettered for Marklin Magazin Note: features for the first time improved running gear

Note: metal front coupler was replaced with standard plastic one with 88953’s release

Marklin 88954 (2015-2017) Belgium State Railways (SNCB) class 96 locomotive. Era III. Note: features hand-painted boiler bands for the first time and handsome paint detail on the cylinder
Marklin 88954 (2015-2017) Belgium State Railways (SNCB) class 96 locomotive. Era III.

Note: German locomotives feature red paint in their design to make stress fractures easier to detect on inspection

Marklin 88955 (2017-2018) German Federal Railroad (DB) class 74 tank locomotive. Era III.
Marklin 88956 (2016-2018) French State Railways (SNCF) class 130 TB. Era III
Marklin 88956 (2016-2018) French State Railways (SNCF) class 130 TB. Era III. Note: trailing lights are suggested and non-functioning
Marklin 88957 (One Time Series for MHI Program-2017) Royal Prussian State Railroad (KPEV) class T 12 based on 1915 prototype which was used for commuter service in Berlin. Era I.
Marklin 88957 (One Time Series for MHI Program-2017) Royal Prussian State Railroad (KPEV) class T 12. Era I. Note: two trailing lights in this version

Royal Wurttemberg (K.W.St.E) T 9 tank locomotive: Marklin 88952

The 2005 release of the Marklin T 9 tank locomotive painted and lettered for the Royal Wurttemberg State Railroad (K.W.St.E) featured a 5 pole motor and it was the first of its type for this railway produced in the mini-club line-up.

The 88952 produced in 2005 as a “one time series” celebrated “200 Years of the Kingdom of Wurttemberg.”

The Era I locomotive is appropriately coupled with Wurttemberg coaches: 80105, 8700, 8701, and 8739. Marklin’s recent release 5 coach set is also a very good choice: 87009.

Coach 8739 trails the T 9 with destination boards for Boll-Goppingen, its operating number E4 2733 was produced by Marklin from 1989-1998. Eleven years in production does not make this coach particularly rare, but this open corridor coach has been popular with modelers of early trains. Check out the next section detailing the relationship between this coach and locomotive.

Following years of innovation by modelers of Z one such development proved invaluable: marrying coaches with short locomotives. Locomotives of short length and weight have proven to be less than rewarding to operate on the mini-club layouts with turnouts and crossovers with their slight dip in power, short locos are challenged to pass freely through these track features, but one creative minded individual came up with a solution: wiring the axles of a coach to the leads of the locomotive thereby extending the length of the locomotive. In this case the 88952 with 3 powered axles has been extended with 2 additional axles. Wiring the coach involves some soldering and drilling with micro bits, but it is overall a fairly straightforward and easy repair the second time around, the first time should be counted as a learning curve. Adding an LED light panel at the same time is just a little more work. In this example a draw-bar was installed thus permanently coupling the loco and coach together. Performance for this type of locomotive is improved greatly.

Here are photos of the electrical upgrade:


New SJ L5 steam locomotive build kit from FR: Part 2

Not long ago I posted about FR’s recent release of the class L5 steam loco for SJ, it is a build kit, and I just received mine today! The kit is a well designed precision kit, it provides a rarity for Z modeling.

The kit comes packaged in a plastic container with numerous parts enclosed along with visual instructions. It is a kit that requires a Marklin 8801, 88956 or 8803 for motive power along with modification of the side rods and painting the wheels black. The cylinders were placed within the locomotive chassis in the prototype thus the cylinders are removed for this model.

Note: Marklin tender is not required for this kit which provides the correct prototypical tender for the loco.

For those experienced with building rolling stock in Z or working with nickel silver this kit is self explanatory, but for the inexperienced modeler this kit should not be the first. Accumulating some experience with building etched metal buildings should probably come first for new modelers: gaining soldering experience with bigger parts first will be invaluable for assembling the small parts in this kit. I am in the process of learning to do these kits starting first with the excellent non powered Behnke kits offered by Scandinavian Galleries Quality Toys. Behnke kits do not provide instructions and careful interpretation is required to fully understand how they go together, but they are excellent kits that combine gluing, soldering and bending of small nickel silver parts; they provide a good place to start before tackling the very interesting L5 kit.

The packaging of the L5 kit separates parts according to their purpose instead of throwing everything together thus taking care of the guesswork. The beautifully cast metal boiler and cast plastic tender trucks are included with etched nickel and add-on parts such as the buffers which are brass. The tender also includes a tiny circuit board to allow it to pick-up power with its three axles.

Note: The age old technique of picking up additional power from the tender’s wheelsets is a very effective way to increase performance of small steam locos through turnouts and the like!

Some of the add-on parts are super tiny so I highly recommend a very fine tip soldering iron as well as 5 minute epoxy which work hand in hand on models. Until I build this kit I won’t exercise a preference for using glue over solder and vice versa for specific steps, suffice to say solder will be used more.

Paint finish will be applied with airbrush and water based paint followed by decals provided.  A finish coat of clear water based acrylic is always required otherwise the finish and decals would wear.

The kit is FR Item #46.140.91, it is currently available.

What you need to complete the locomotive: 1. Marklin 8801, 88956, or 8803 2. water based paint best suited for airbrushing 3. patience 4. time 5. soldering iron and/or 5 minute epoxy 6. tweezers 7. Xacto blade for cutting parts from sheet 8. time 9. patience 10. magnifying binoculars

Be the first kid on the block to own an L5 SJ steam locomotive in Z!

Stayed tuned for my future post on the completed L5 along with some tips on building the kit.


SJ L5 Locomotive: FR’s new release build kit

An important new release for SJ railroading in Z is FR’s L5 steam locomotive, it comes in the form of a build kit with etched metal parts, cast boiler, and SJ decals. Note: I ordered mine and in a follow-up post I will review the kit and step-by-step photos. If you are new to soldering and assembling nickel silver/brass etched kits either buildings or trains the right tools make all the difference for this fun and rewarding extension of Z railroading: stay tuned!

FR L5 locomotive item #46.140.91 is available directly from FR for a little more than $100 USD including shipping. Ordering from FR is easy and shipping to the United States is fast. Visit FR’s homepage http://fr-model.homepage.t-online.de/ and set-up an account. Note: 19% VAT is reduced from posted Euro pricing for United States buyers.

The finished model includes loco shell only and tender without wheels, to complete the project Marklin class 24 or 74 locos provide the motive power. At this time I am not sure the recent release class 74’s are appropriate for this kit due to their new side rod design, perhaps the class 24’s with tenders are better choices due to the inclusion of the tenders and its wheelsets(?). I will follow-up next week after receiving my kit!

As is always the case with FR postings, I wish to announce new releases by this small high precision manufacturer because their offerings quickly sell out.

Prototype: class L5 locomotive built by NOHAB in the 1930’s was designated as a branchline passenger and freight locomotive of which 5 were built in Trollhattan.


Rewiring Marklin 8871 and 88711: ICE trains go fast!

Marklin’s 1990’s releases of the TEE 8873 and ICE trains 8871 and 88711 suffer from a design flaw: poor electrical connections caused by the couplers and a train set wired in parallel. Similar to those old Christmas lights when one bulb went they all did, these Marklin train sets suffered a similar fate that was corrected with the further releases of the TEE variations. The ICE train sets changed in another way instead of having two powered units as did the 8871 and 88711 the 88712 and 88714 included one powered unit located in the middle of the train this being a coach.

A simple solution to to correct the poor performance of the three TEE and ICE trains is to bypass two diodes located on each circuit board of the powered units. There are four diodes located on each circuit board, two affect the lights (LED’s) and two are near the motor. Bypassing the diodes near the motor with a soldered wire is all that is needed to allow the locomotive to move forward and reverse thus allowing each powered unit to work without the former wiring constraints.

Note: no need to bypass the diodes on any other TEE train version released after 8873.

Note: 30 gauge wire is recommended for wiring circuit board, tinning the ends of wires is recommended before making the soldered connections.

The early ICE trains use an interesting light bulb with a red and a clear bulb soldered to a circuit board similar to the traditional mini-club bulb. The red bulb is hooded to direct the light better, but unlike the LED’s the light is rather dim unless the loco is cranking! Note: very fragile bulb and no longer available, but if you are good at soldering you can make your own.

The couplers as mentioned are faulty for electrical connectivity, but work great when both powered units are rewired: coach lights no longer flicker. The couplers for the two ICE trains are susceptible to damage due to the untethered ends of the copper strips, great care should be taken to prevent bending. A good recommendation is to stock up on parts as they become available on Ebay. The original couplers for the 8873 are infinitely more resilient than the couplers used on the first two ICE trains.

Note: save old loco light bulbs that don’t work, new ones can be easily made by using the original circuit board for soldering news bulbs to them, generic bulbs are available at train shops in the correct size.

Siding: the 5 pole motor replacement for the 8871 + 88711 is 211907 which is one of the more expensive motors for upgrade, and you will need two. I have not made the upgrade to 5 pole with my sets, the original 3 pole motors work exceptionally well at low speed and throughout the range, but the 5 pole motors would be much quieter.

Siding: removing the tight fitting shells from 8871 and 88711 is more easily accomplished with synthetic guitar picks of .70 mm thickness or thinner.

VT 11.5 TEE Railcar: Improving Performance

Improving performance can be a bit of a misnomer when the talk circles around modifying a Marklin Z loco or other article in the mini-club line-up. Upgrading 3 pole motors to 5 pole motors is a significant boost to performance, but other improvements may deserve further research and discussion with other railroaders and their experiences.

One improvement I have heard about for many years is actually one I heartily suggest, Glenn and Sandy Stiska of Florida rewired several sets for me in the late 1990’s with this same repair. The modification I am talking about is the addition of two wires to each powered end unit of the VT 11.5 (8873) and the 2 ICE trains including the special release “Amtrak.” For many years this modification has been used with multi-train sets with more than one powered unit. Wired in parallel these early sets were poor runners because they relied on something close to perfection, if the electrical chain was broken between head loco, coaches and end unit the train would not go.

The 8873 used an early conductive coupling which connected the coaches to the powered end units that has since been redesigned: all railcars now use a new flat conductive coupling versus the early spring copper one.

photo: 8873 powered end unit with first generation coupler on left and 88731 Max Liebermann with next generation coupler on right

The original wiring included a pair of diodes for each circuit board which dropped the voltage to each powered car and only allowed each powered unit to go in one direction a contributing factor for stalling the train and/or flickering coach lights if power was interrupted which it readily did. The solution is to bypass the diodes by soldering a wire around each diode thus making it possible for each powered end unit to go in both directions.

A fine point soldering iron is recommended for the repair and just enough wire because too much would interfere with installing the shell.

Try this repair if you have a set of this type that does not run well, the results will blow you away!

Six versions have thus far been released with the last being the “Blue Star Train” with its very striking paint scheme.

Siding: removing the shell of the 8873 is accomplished by removing coupler if it is present and carefully inserting a small screwdriver in the coupler box, if the shell does not easily pop up it maybe stuck to chassis due to hardened oil which will require finessing to unseat it from the chassis, removing the shell from all other VT 11.5’s will require lifting the front of the shell and wriggling it around the permanent coupler. Caution: do not pull on a permanent coupler, it is not removable unless circuit board is removed first.