Category Archives: American Prototypes

Archistories American Prototype: 101181 “Goldtree Station”

If it is possible to visit a late 19th century western United States town built by gold perhaps this station in its small dimensions satisfies that goal. Measuring 5 inches in length x 2 1/2 inches in overall width x 2 inches in height the “Goldtree Station” by Archistories is the fictional hub and gatekeeper for the outside world, it greeted new comers with grand dreams of making it rich and goods to keep a decidedly inhospitable landscape habitable.

This year marks the important anniversary of the Transcontinental Railroad: 150 years East and West coasts joined by rails at Promontory Point, Utah. And a good time to consider modeling a western gold rush community in Z starting with this nice building exclusively sold by ZScaleHobo.com. And Marklin’s “Bumble Bee” locomotive and its passenger set from a few years back are a good train set for this station.

A fairly simple to build kit featuring partition walls which aid in realistic lighting effects, filigree parts which add realism to platform supports, and a mix of building materials including terracotta roof tiles and wood construction.

Goldtree station signage is laser cut with an appropriate American style font of the 19th century.

Railroads grew quickly after completion of the Transcontinental Railroad as did towns throughout the United States. Station and depot types changed too thus small stations with attached freight depots largely disappeared in the teens and 20’s, they were replaced by masonry structures supporting a network of hubs as people and goods were transported all over the United States. Towns who’s singular purpose supported the gold rush either grew independent of it or largely ceased to exist.


Note: exclusive worldwide dealer for this item is Zscalehobo.com

Construction notes: the ingenious feature of this Archistories kit are snap-in window frames and glazing, pre-cut glazing snap into place with gentle pressure followed by window frames, filigree timber sections are finally glued in place and permanently seal windows. Open freight doors are possible but interior detailing will need to be designed by the builder. *use glue sparingly and use great patience with light paper parts which cannot be realigned after gluing, plus snap-in window frames are prone to easy breakage, fraying and distortion.

Another important construction note: Part F10 is a delicate filigree part comprising the main entrance framework, after removing this part from the part sheet two more tabs need to be removed from either side of door frame: brackets should be flush to the structure. In my interpretation of this building it was missed thus reflected in the photos. A second important point is to install the 4 brackets (Part H4) for freight room before attaching roof.

Marklin 88035- Denver & Rio Grande Western Railroad 2-6-0 “Mogul” locomotive featuring brass construction (2004-2006)

UP + SP E8’s: joint collaboration Marklin/AZL

Marklin 88627
Marklin 88626 (only 46 prototypes were produced of the E8 ‘B’ unit)
Marklin 88628

The post war General Motors E8 diesel locomotive was built by their Electro Motive Division (EMD) in Illinois, it boasted a power reserve of 2250 hp for passenger service. Some units remained in service into the late 70’s pulling freight trains. Significantly longer than the F7 with significantly fewer produced than the latter, the E8 was designed with 2 – 6 axle trucks with 450 ‘A’ units produced versus more than 2000 F7 ‘A’ units.

Several prototypes were modeled in Z for the PRR, UP and SP railroads as a joint venture between Marklin and AZL, but aside from Marklin trucks/couplers and box the collaboration seems limited in scope with majority partnering coming from AZL.

Crisp graphics and accurate paint schemes plus detailed shells and trucks are equaled by what’s inside: heavy ballasting and robust brush-less motor.

Taking a look inside these locomotives reveal several unique design features of AZL versus Marklin including a heavily ballasted two-part frame. Holding the frame together are 3 pairs of phillips head screws which all but conceals the motor and transmission except for the circuit board which rests on top.

partial disassembly of E8 ‘A’ unit with showing skirting replacement part and extra truck included with loco

Servicing either of the trucks requires popping off the fuel tank thus revealing the middle set of screws: loosen only. Service one truck at a time by removing its designated pair of screws followed by gently prying the frame apart thereby allowing the truck to pop out. Repeat for other truck and test on track before reattaching fuel tank cover and shell.

one end of frame slightly pried apart allowing removal of truck, worm gear and pick-ups run length of frame
fuel tank and truck removed from frame, truck is held in frame within the recess in frame’s casting, two sides of frame secured with screws closes the space around top of truck frame thus securing in place
1 traction tire per truck and 2 powered axles per truck
locomotives come with Marklin couplers installed which can be replaced with provided skirting, also included is an extra truck, photo shows location of 3 screws per each side of frame
circuit board and LED light panel at one end are visible without shell, photo shows correct gap between two frame sides, drive mechanism is held within frame

Note: AZL gearing is comprised of nylon gears versus Marklin machined metal gearing, and AZL factory lubrication is grease versus oil.

brass worm gear and plastic skirting mount at frame end, frame is pried apart to allow truck removal

A full disassembly of the chassis and motor entails removing all 6 screws that hold the frame together with all components smartly fitted within. It should be noted that proper assembly of the frame leaves a consistent gap between the two sides: two frame sides do not touch. Transmission is properly fitted with plastic intermediary part positioned with prong ends down and engaged with holes in frame. Parts comprising motor and transmission must be seated properly for reassembly of frame, it is very important not to force these parts together.

truck gearing is permanently installed versus the take apart nature of Marklin trucks
inside and outside view of frame sides: worm gears held in place with nylon guides seated prong side down in designated holes
Inside view of the frame sides reveals a straightforward design concept
underside of frame shows normal gap between frame sides

The 3 ‘A’ units come equipped with prototypical skirting to replace the Marklin coupler which is simply installed following removal of shell, un-clipping coupler and spring, and sliding new skirting part with prong ends into frame recepticle.

LED light panel sits in slot with skirting bracket held in place with pressure from frame sides
skirting bracket is a two outlet plug which accepts the 2 prongs from the replacement skirting part, coupler is held in place with a removable metal clip otherwise the coupler includes the Marklin style coupler and spring, LED light panel is seen at the top of the frame assembly held in place with a designated slot
unique removable metal clip system for the coupler otherwise a normal Marklin set-up

Pulling power is further improved with traction tires which in combination with the heavy cast metal frame evenly distributed across the wheels ensure smooth operation. No need at all for adding extra weight to these locos!

Roof equipment varies between the prototypes thus the models reflect prototypical accuracy.

roof equipment varies between the locomotives

Very impressive locomotives from the stand point of aesthetics and performance unfortunately the installed Marklin couplers do not allow use of the only appropriate coaches produced by AZL. Maybe coaches are in development?

Siding: Marklin 88629 (PRR) is the fourth locomotive in this series


Excursion: The Milwaukee Road Heritage Center

The Milwaukee Road Heritage Center in Montevideo, MN is a railroad museum dedicated to the history and preservation of the The Milwaukee Road:

https://www.montevideomrhc.org/about.php

My Wife and I passed through Montevideo about 5 years ago which was our first visit in the yard of the Heritage Center. No fence or people were present on that visit, it largely looked abandoned, our guess for many of years? But we were drawn to the site after seeing the dome ends of two Hiawatha sky-top coaches or should I more aptly describe as the barebones framework of the signature sky-top cars unmistakable from Montevideo’s main street.

Just this August we were in the neighborhood and decided to stop; we hoped to see if any progress was made in the 5 years since the last visit. This time we were greeted by the friendly and knowledgeable Director of the Heritage Center who also gave us a complete tour of the site lasting 3 hours: what a treat! And boy oh’boy what a difference 5 years has made to this unique railroad museum with a growing and already impressive collection of coaches, MOW vehicles, locomotive switcher, turntable, station, loco shed, sanding facility, and museum quality working HO layout which displays the working yards of Montevideo in the glory years of The Milwaukee Road.

Max Hinde, Director of the Milwaukee Road Heritage Center stands adjacent to the train station in Montevideo, Minnesota. Housed in the station is a very large collection of Milwaukee Road artifacts, photographs, and station masters’ office complemented with all the essential equipment. Max is ‘tops’ in my book for remarkable practical expertise with all the railroad equipment and historical knowledge.

Not much progress has been made with the sky-top domes, the museum is currently looking for a qualified welder: the plan includes modifying a coach in the collection. ‘Wishful thinking’ are not words that apply to this museum which boasts 160 volunteers who are passionate railroad people with the grit and sound judgement that is already on display.

A beautifully restored sanding facility (sand house) furnished with every essential tool for locomotive maintenance sits track-side. An Eagle Scout earned his certification roofing the sanding facility which sits in its original location down track from the working turntable.

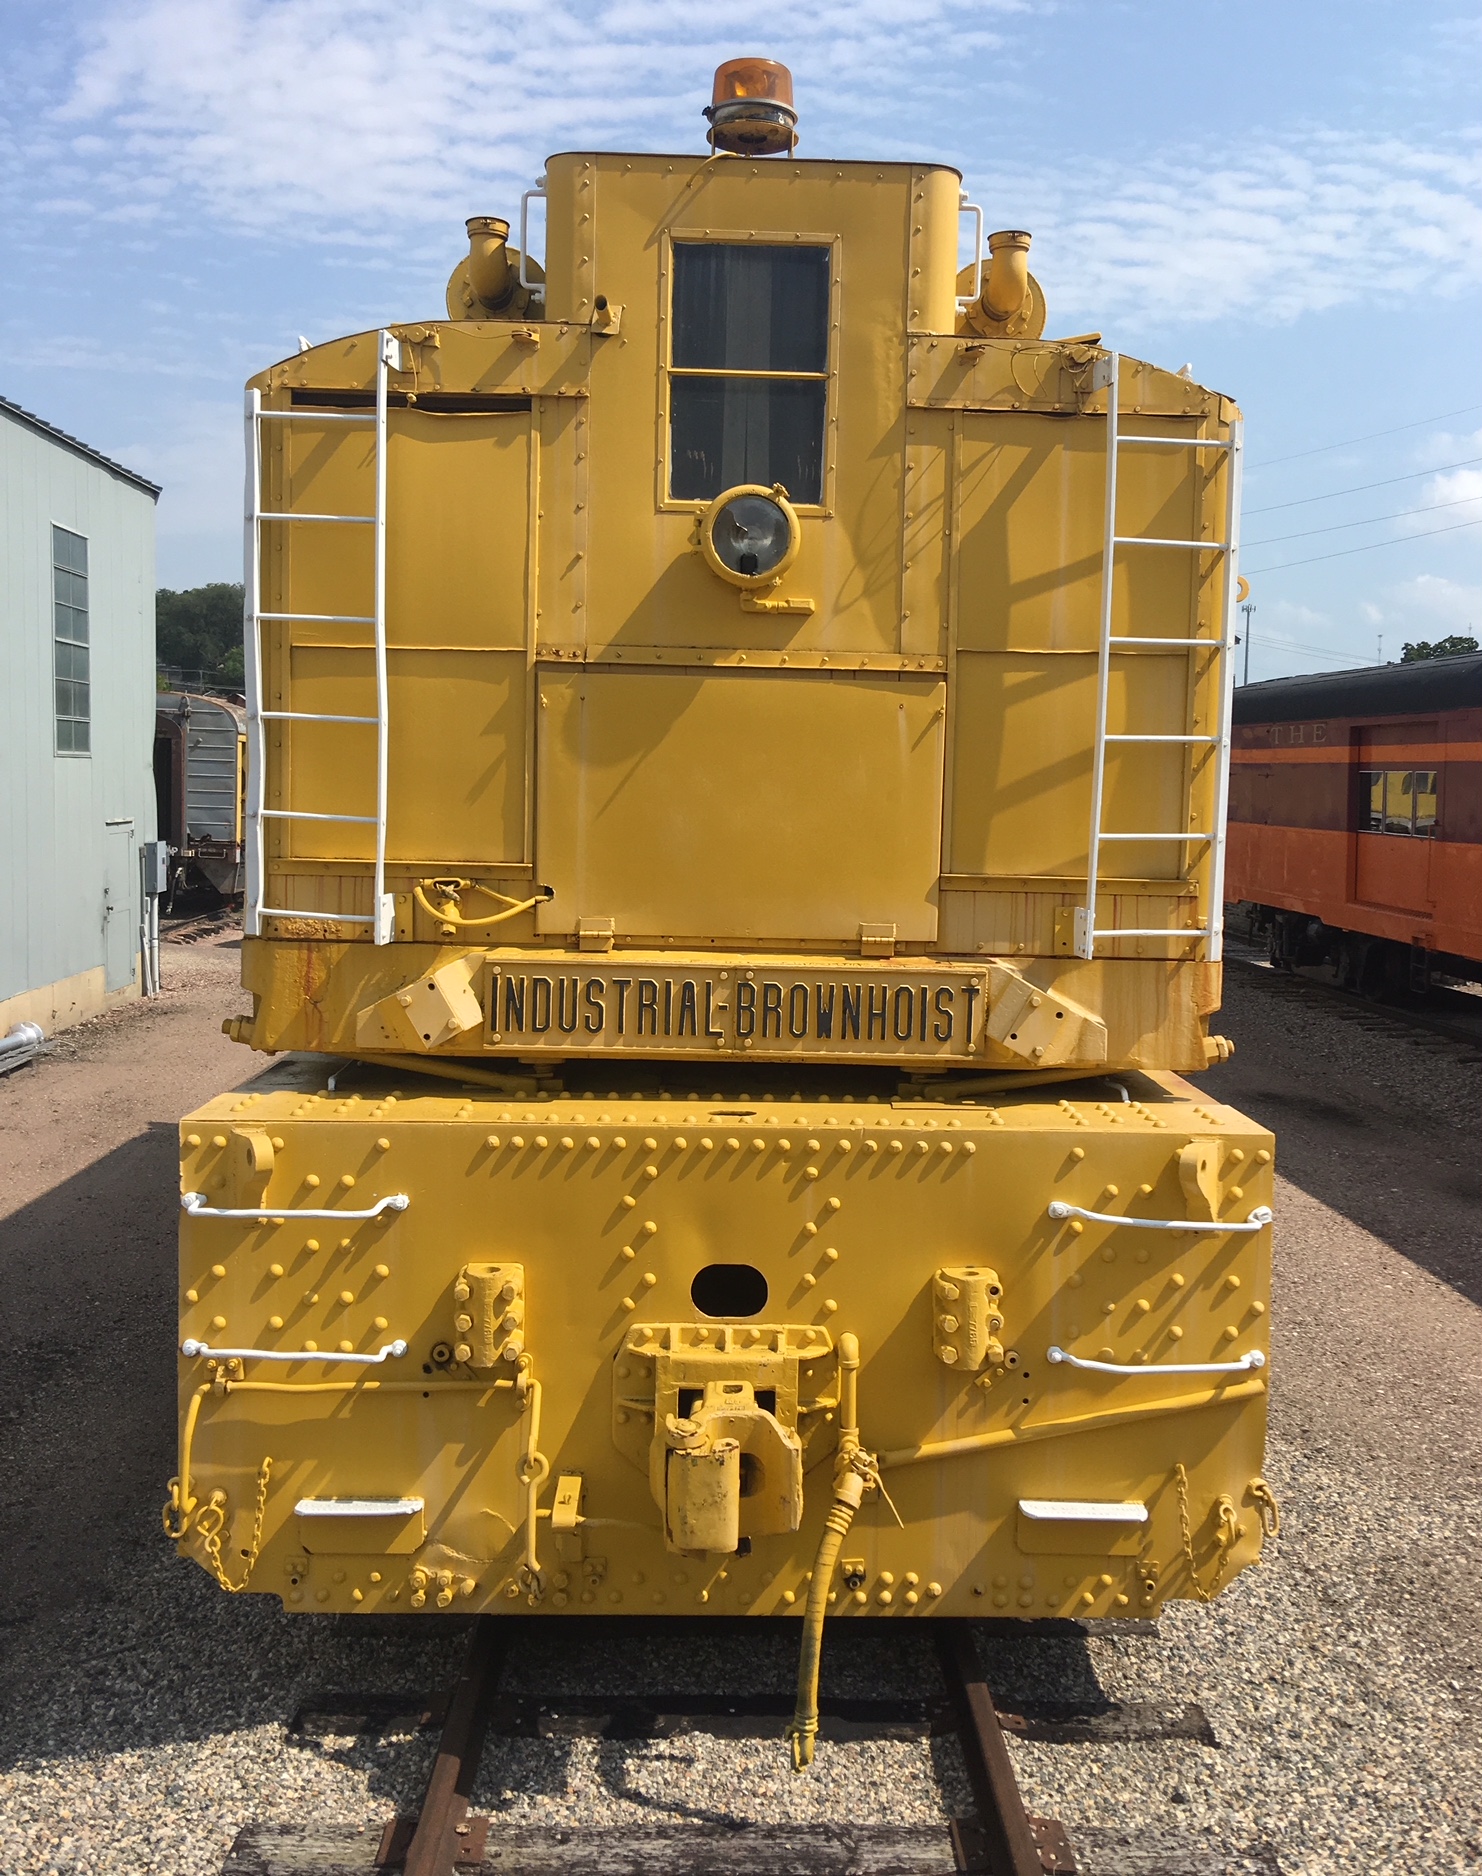
An impressive locomotive shed is home to a working switch engine retired from refinery work along with a very interesting MOW crane. Note: large chest below headlamp on loco is not a toolbox, it is the cabinet housing for the sand cylinders.

The cab of the diesel switcher is impressive as a static piece of industrial equipment, but our guide offered to start it up which further impressed the heck out of me. Nothing better than the sound of a diesel locomotive coming to life. Doubly impressive that our guide effortlessly cold started this large diesel locomotive.

The Milwaukee Road used MOW vehicles as do all railroads here are two interesting examples:

Speeder used to haul men and tools when coupled with a trailer, it was propelled by a simple gas engine seen here in its own shed at the Heritage Center:

Another MOW vehicle was a tractor equipped with rail traction and coupler: soft rubber tires carry the vehicle over the tracks, rail wheels align with rails, operator engages hydraulics to slowly lay the rail wheels in place on the tracks, rail car couples with tractor thus making simple switching functions in the yard possible. The tractor was limited to sideways movement on the rails, it is a unique and interesting piece of railroad history.

Note: sand cylinders and coupler with lower piston to adjust height

360,000 pounds of heavy duty machinery, this rail crane boasts two engines: one for the wench and one for the swiveling deck, it is also one big crane that is capable of lifting a locomotive off its trucks. Pictured on the deck of the behemoth crane car is a thick heavy cast steel yoke used to fasten either side of a locomotive shell for lifting and/or righting a locomotive after derailment. This too is operational although it was not running during our visit.

Two interesting original Milwaukee Road cabooses include the standard bay window design used by numerous North American railroads, but a big difference applies to the two in the Heritage Center collection. On the left can be seen the standard design caboose mounted to a very long deck matching the overall length of coal cars used by The Milwaukee Road.

Bright paint and lettering adorn the exterior of the 01960 caboose while inside the caboose shows its original charm and splendor in you are tough as nails, sport steel toed work boots, overalls with plenty of mends and grease. Otherwise these cabooses were full of hard steel edges and no much in the way of ‘comforts of home,’ but railroad people are durable to machine and weather visiting these rare cabooses gives a window of working life of the end car.

The original turntable is fully operational with a few coaches alongside, a recent newsletter comments on the feasibility of rebuilding the roundhouse, it will be a fascinating addition to this impressive museum.

Membership is reasonably priced at $25/year: http://www.montevideomrhc.org/membership.html

Address: Milwaukee Road Heritage Center-Milwaukee Road Depot, 301 State Road – Suite 1, Montevideo, MN 56265

Lastly: I briefly mentioned the HO scale model railroad earlier in this post, but it too deserves a few words as it encapsulates the history of Milwaukee Road railroading in Montevideo, MN which was an important layover for cattle coming from the Dakotas and heading to Chicago. Several digitally operated F7’s make their way along a very large layout with many scratch built structures and scenery plus custom painted mural surround.

Siding: the locomotive axle bearings were greased with packing within a hinged covered box referred to as a journal box

upgraded Timken bearings can be seen on the 360,000 pound crane which does away with the journal box


Excursion: Great Northern and Cascade Railway

A few hours drive from Seattle to Spokane in the Cascade Mountains of Washington state is a small railway for railroad enthusiasts, it circles the station at Skykomish and offers free rides to all who climb aboard: all day long!

The small railroad encompasses a complex design featuring a snow tunnel, masonry tunnel, and bridge. Along the route the train embarks on a well landscaped trip with the Cascade Mountains naturally framing the town of Skykomish, WA.

Sixty volunteers donated their time and energy to lay the extensive track work 5 years ago whose organization owns a couple of locos and ride on cars. A surprisingly fun ride that includes two separate loops around the station and outer perimeter of the property, it even includes a very nice locomotive shed.

Inside the station visitors can enjoy displays of early Great Northern Railway artifacts, its porch serves as a very good viewing platform of the active BNSF mainline.

The most Northerly Transcontinental Railway line in the United States the Great Northern Railways connected St. Paul, MN and Seattle, WA until 1970. The natural landscape in this part of the United States is spectacular with many train sightings possible as BNSF operates long trains of mixed freight and unit trains of lumber, mineral, and petroleum. The drive alone is a recommended spectacle, and railroading history is an added bonus.

Siding: a very rare small crane for moving blocks of ice is part of the collection of the Great Northern and Cascade Railway

Excursion: California State Railroad Museum

A railroad museum of particular interest to railroaders of all ages is this one in Sacramento, CA: California State Railroad Museum: https://www.californiarailroad.museum/

Located in Sacramento the museum is situated in what is called Sacramento’s Old Historic District alongside several blocks of rebuilt historic merchant and railway buildings.

A day long adventure with 2-4 hours in the railroad museum alone. Very friendly museum staff and guides describe the history of early railroading in CA and the West.

The museum’s exhibits are on par with other well regarded museums: large ambitious dioramas and restored trains.

photos (above and below): Built in 1862 (Philadelphia) and in service November 1863 (Sacramento) Central Pacific Railroad No.1.

photo (below): Virginia & Truckee Railroad No. 12 Genoa, Baldwin, Philadelphia 1873

photos (2 above/2 below): North Pacific Coast Railroad No. 12 Sonoma, Baldwin, Philadelphia 1876

photo (below): Virginia & Truckee Railroad No. 13 Empire, Baldwin, Philadelphia 1873

The train collection is rather small in comparison to other railroad museums most notably the Railroad Museum of Pennsylvania, but it is very strong on what it has including the final steam locomotive purchased by Southern Pacific: 4294 cab forward locomotive with tender. I was in awe of this loco for its sheer mass and size, and several groups in the museum at the time were in awe too! It should be noted that not all locomotives are on display at any one time, it is notable that the collection owns 8 of the surviving 45 full size steam locomotives built prior to 1880.

Southern Pacific 4294 cab forward steam locomotive built by Baldwin 1944, it featured oil fired tender with a combined weight of a million pounds.

Displaying fine early and rare steam locomotives is one facet of the displays in the museum which also includes a Santa Fe F7 and a display model modern aerodynamic electric by Siemens.

For toy train collectors there is a display including a few Marklin gauge 1 examples and Lionel Standard Gauge trains, I did not have the time this trip to tour this part of the collection, but I understand it is very good!

Along a wall on the way to the exhibit hall is an early railway regulator built by Seth Thomas in pristine condition and lettered for the Santa Fe railroad, it is perhaps the finest American railway regulator I have ever seen. Keeping trains on time and schedules tracked was helped by precision eight-day regulator clocks such as this fine example that incorporated a mercury pendulum which compensated for changes in ambient temperature.

Sometimes museum displays can go off the rails and detract from the historical importance of that which is exhibited, but in the case of the late 1920’s CN sleeper coach featuring moving train simulation it is WOW! Utilizing dim original lighting fixtures this coach from the ‘heavy weight’ era is fully furnished with original folding seats and bunks found in Pullmans of this era. The periodic flashing strobe light in the darkened windows give that passing scenery affect fully accentuated by the gentle rocking of the entire coach car, one has the going back in time feeling (sorry for cliche).

The AT & SF Super Chief Cochiti dining coach starts with a tour of the large kitchen followed by the dining room set up with tables dressed with china sets from various railroads: a great collection in and of itself. The appointed tour guide played chimes appropriately tuned for breakfast and dinner announcement.

photo (below): near the loco shed sits a brightly painted Union Pacific caboose with operating number 25256

A superb example of a crane is this one located at a siding for loading and unloading trains arriving in Sacramento, CA.

Capping off a fun day at the museum is the museum shop featuring lot’s of very good railroading books. And check ahead for featured excursion trips!

Marklin F7 A-B-A sets: improving performance

If you are lucky enough to own one of the Marklin F7 sets “Alaska” or “UP” consider this easy repair. Or if you don’t like the wires running through the locos consider this easy repair.

Removing the wires is step 1: cut the wires before removing the shells and carefully remove the wires leading to each circuit board.

Soldering in place four very short wires is step 2: cut 4 small wires to bypass the 4 diodes on both circuit boards and carefully solder the wires in place.

Result: no wires running through the A-B-A units and much improved running performance thus allowing each locomotive to work independently of each other. Note: headlamps will light in both A units at the same time.

Micro-Structures and American Prototype Architecture for Z

Miller Engineering released a line of buildings kits years ago called Micro-Structures designed along the lines of typical architecture found in many small American towns. If you visit Main Street in many USA towns the original buildings haven’t changed much since they were built in the late 19th century, the towns themselves have changed dramatically and some buildings have gone through facelifts and demolition here and there, but for the most part the old buildings are intact thus modeling most any era of American railroading is possible with these building kits.

V101- Victorian House: “Empire” (note: additional scoring is required with this kit)

V606- Victorian House: “The Victoria”

The concentration of the line was on Main Street, but it also included a few Victorian houses that rounded out the line nicely. Note: I am using the past tense because unfortunately the line was discontinued with only a few new kits available here and there from dealer old stock. Ebay is a good source as is ZScaleHobo.com. I found a local dealer who had a few left over kits which were very popular in their day and should be today; they are well designed in historical scale and detailing plus well made out of heavy gauge etched brass.

303- K.C.’s Hardware Store (note: features printed windows with store logo) lime sometimes appears over time in mortar joints and bricks, I applied diluted white paint followed by wiping off to give this effect

404- The Triangle Hotel & Bar (note: features printed window masking for the street level windows as well as clear acetate for the other windows) building as it appears right after painting but before window glazing. Typical building type for a mid size town, but this design first appeared in NYC, that building is called not surprisingly the “Flat Iron Building”

505- Crestline Theater (note: two options for marquee include a solid marquee with etched movie now showing or a cut out marquee designed to hold a paper now showing sign, this building was built with solid marquee) detailing is so good with this kit that a depiction of can lights above the doors is included that look great lit

With a few exceptions the kits go together quite easily, but I found the large Victorian “Empire” House to have shallow scoring lines for bending in this case further scoring was required. Overall the Empire house was the most difficult of the group to make.

606- Pitman’s Deli (note: excellent detailing with printed store windows and beautiful awning, plus recessed door)

I found some kits came with acetate for the windows while others did not, and a couple had just enough for street side windows with very nice printed signage.

901- City Fire Station (note: I tried building this kit years ago with the recommended Super Glue, it was a disaster and tried these kits again until this Fall. Solder is the way to go for me!)

One obvious advantage with these kits is lighting, they will not leak light as the metal is opaque, but you must fashion windows masks or partition walls for realistic effects.

801- Townhouse #2 (note: under construction the model is assembled but prepping it for painting will include sanding solder joint smooth and bending to make the building sit flush, followed by a good cleaning with diluted Dawn, warm water and a soft toothbrush, green residue on building is flux which washes off easily with warm water and original blue Dawn)

Prepping the kits for assembly takes time, any rough edges must be sanded or filed. And after assembly the buildings need thorough cleaning to remove solder flux or other debris. Super Glue or soldering are the choices for assembly, but I prefer soldering due to the speed and control of this method. Soldering is easy if you use flux in addition to the solder with flux. I solder at 750 degrees and place water soluble flux at the area to be soldered with a toothpick. Note: solder melts and follows the source of heat, try to avoid applying solder directly to the soldering iron tip.

100- City Scoop (note: this is the only kit that requires Super Gluing, it is made of stainless steel and solder will not adhere) this building features great detailing including ice cream machines and work table on the interior, plus picnic tables, air conditioning unit and trash cans on the exterior. I had fun with this kit and painted a whimsical ice cream cone. I also left the interior natural stainless steel, but I painted the ice cream machines with silver solvent based paint and painted the outer edge of the ice cream cone with metallic copper solvent based paint just to catch a sparkle there. (note: if you discover a build-up of Super Glue after its cured it can be removed easily with a razor blade and wear gloves working with Super Glue!!!!!!!!!!)

Note: preparation of the building will include sanding or filing smooth any solder ridges or residual glue that will otherwise show up under a thin layer of paint.

Window glazing is glued in place after painting with 5 minute epoxy. As stated earlier acetate was missing in some kits I bought or not enough was included, if you build Archistories kits use some of the leftover acetate as they are very generous at Archistories.

5 minute epoxy might be the best option for securing these buildings to the layout if it is portable otherwise they sit flush to the surface and anchoring may not be required.

The small buildings in this line-up require simply cementing window details in place then folding buildings sections together and cementing. The roof requires bending along sides and molding embellishments before attaching to building. Note: fold the front section of roof first before side sections, a separate folded section goes over the front of the roof thereby giving a nice finishing touch thus do not cement the roof until this part goes on! Note: everything is outlined well in the instructions, my notes are simply to highlight important aspects that arose for me.

These buildings look better in person, and even better with a GG1 rolling by capping off the hard work and meticulous attention to detail involved with their construction. And your family will be proud of your good fortune!

No complaints about these kits, they were fun to build and modify as needed!!! And soon to be very collectible!

Siding: essential brass bending tool is “The Bug”

Blast from the Past: Marklin 88035 “Bumble Bee”

If you are an American railroader the “Bumble Bee” loco may already be in your collection, it has been released in many versions and many scales by numerous manufacturers. In 2004 Marklin released their “Bumble Bee” loco and tender for the mini-club line-up, it was cast in brass with metal tender. This “One Time Series” featured fine detailing and add-on parts with non working headlamp.

Founded in 1870 the Denver and Rio Grande Western Railroad (D&RGW) was originally a narrow gauge railway who’s motto was “Through the mountains, not around them.” The history of this railroad spans more than a hundred years from its founding as a coal and mineral narrow gauge mountain railway, in 1988 it merged with the Southern Pacific.

The Louisiana & Nashville Railroad built the first 2-6-0 locomotive of this type in 1864, it was a record setter due to it being the largest locomotive in America at that time. The Marklin 88035 could be said to be modeled on a later version with independent front bogie. Service span for this locomotive type was 1860-1910. Operating number for the Marklin “Bumble Bee” is 136. Baldwin Locomotive Works built the narrow gauge 2-6-0 locomotive for D&RGW 1881-1902.

Note to collectors: Marklin’s 88035 is sought after by Z gaugers but also N scalers due to its slightly larger size. 88035 is the first and only mini-club locomotive modeled slightly bigger than scale. Produced as a One Time Series in 2004 it quickly sold out, today it is high on the list of sought after secondary market locomotives. Pricing for this loco range from $500-$1000 (new/mint), but before you buy consider condition as a big part of the price, average used ones in working condition and 80% cosmetic condition should be in the $250-$350 range. Very careful buying trains online without seeing them in person unless you are dealing with a reliable seller or store. Reynauld’s in IL,  ZTrackResale and Z Scale Hobo are recommended sources for secondary market.

Note: to go with this fine loco is the 4 car coach set lettered for D&RGW: Marklin 87910.

Good Luck and Have Fun!

Siding: The Railroad Museum of Pennsylvania in Strasburg, PA owns a Baldwin 2-6-0 locomotive for their collection. One of the finest collections of American railroad equipment can be found in this museum: http://www.rrmuseumpa.org/

Trains are Trains – Marklin Models of Trains are something different and greatly so!

Marklin 88855: BR 03 Express Locomotive of the DB

A subtle thought occurred to me the other day, I was thinking about my last post on Scandinavian snowplow locos of the SJ in Sweden while having a brief moment of reflection during work as a photographer of architecture and interior design. My Wife and I work together so moments of repose sometimes happen during brief interludes moving equipment from the shot just taken to the next.

Marklin 88063: Serie 232 TC of the SNCF

I am very impressed with the offerings of Marklin and their z gauge line in the last five years, the following is a brief post and interlude in the normal technical and historical postings thus far presented at ZTrainsWeekly. This post is dedicated to the type of collector I have met on many occasions hanging out in train stores across the country, train meets and clubs, those that have taken on collecting expensive tiny trains because holding them in their hands and marveling at their striking detail and charm make them happy.

Marklin 88833: Serie 150 Y of the SNCF

So what does a Z gauge railroad loco or rolling stock have in common with the prototype railroad equipment of a particular railroad. First they are in a scale of 1:220 so every 1 inch translates to 220 inches in prototypical scale thus accurately reduced by Marklin in length, height and width dimensions. Graphics and lettering are correctly rendered by Marklin fitting accurately in historic timeframe. Detailing of trucks and equipment appear to show few differences with the prototype. Working headlamps and running lights are sometimes designed into the model and for some vary little with the prototype. But if we start with the prototype and compare it to the Z railroad model of Marklin few similarities can exist including actual equipment operation those being sanders, air brakes, working engines and the like. I hope I haven’t lost the interest of my readers, I am close to making this posting worth while if you have been queried by those that have yet to be bitten by the railroading hobby.

Marklin 88134: BR 132 of the DR

The model can only be a version of the prototype, but an impression of the prototype is far better than real diesel model locos running on diesel fuel throughout your house killing your houseplants and annoying your wife or steam and arcing electric ones. The comparison between the prototype and the model resides in the idea that the prototype surfaces on the rails in front of us and embodies history, design and awe whereas the model railroad elicits its connection to the prototype but also triggers our imagination thus connecting us to the models in serious and creative ways. All model railroad collectors are connected in this way, we can study the history of the prototype and marvel at its representation as a model as something else thus collecting the miniature is our railroading connection not limited but expansive.

Marklin 88106: BR 05 of the DRG and Marklin 88075: Class J-2 of NYC

Models of trains and their prototypes were built side by side since railroads began in the 19th century, Marklin was the first to successfully manufacturer commercially available miniature trains. Cheers to Marklin and another 158 years of outstanding trains!

An Introduction to Marklin Z American prototypes and rare small batch imprints

Marklin has brought to life American railroading prototypes in small measure if one compares the total entries of European ones: lot’s of F7’s, Mikado’s and GG1’s along with respective rolling stock. The eras portrayed are mid century primarily with a few earlier exceptions. Micro Trains is stronger in the field of American prototypes with their exhaustive survey of various rolling stock each boxed with a well researched and charted description. American prototypes are not a strong category for Marklin Z, but when they release something new like the GG1 it is a superlative example. And the F7 sets or individual ‘A’ units are widely collected in their infinite variety. But one type of a rolling stock example in each category makes life a bit challenging if you collect exclusively Marklin, and you are serious about railroading. Some collectors have opted for trading out couplers so MicroTrains rolling stock and locos can be used with Marklin and vice versa. It is a good trade off, but those of us lucky enough to own the Commodore Vanderbilt are still stuck without a coach set. Other manufacturers are on the scene producing high quality models including but not limited to AZL, and their current collaboration with Marklin  in the production of three variations of the E8 maybe the first of more collaborations, who knows?

If you are a tried and true collector of Marklin Z American models like me you may already know about the small batch special imprint rolling stock. In coming months I will be including examples of these rare offerings that little information has thus far been known. Hopefully with the help of others in this field of collecting I can shed more light on this topic until then stay tuned and happy railroading!