Category Archives: Siding

Weathering Laser-cut Buildings: MBZ Project

MBZ fills a particular niche for model railroaders in Z, they offer buildings age old building types along railroad yards, farms and countryside scenes along small streams and rivers. MBZ’s style are buildings with the patina of age through deep cut detail work this quality becomes apparent.

MBZ sells a whole host of paints and supplies particularly suited to finishing these buildings through a technique of sponging on water base paint after applying a base coat of primary to retard too much soaking in of the finishing touches. How to videos show these paints to be easy in applying and relatively opaque although dilution of paints and light touch with sponge applicator is well suited to vary the transparency of the paint. I am new to MBZ kits and although I have not tried their paints myself I have seen finished examples at Reynauld’s in Elburn, IL, they are really quite good and the paints give the impression of realism that is almost required if you intend to build these kits, they are of course delivered in similarly pigmented parts thus monochromatic and unrealistic.

I am well versed in a technique that many modelers employ: dry brushing. For those unfamiliar it is a painting technique that is unlike any other in bringing out surface detail. The technique itself is suggested in the name ‘dry brush.’ After saturating a brush with paint continuously run it back and forth over a paper towel until traces of paint can be seen. With a light touch and testing in a small area first use the brush to selectively add color either soot staining on roof tiles around a chimney or soot above a locomotive shed door thereby playing on the impression of accumulated soot from steam locos over time.

There is a little bit of artistry and technique combined with personal preference during the dry brushing application, but it is fun to see details become three dimensional and the life of a building carefully constructed come into being.

I often times mix paints for dry brushing and/or apply layers of different colors. The paints I choose are railroad colors available at my local dealer, and they are all water based. Water base paints dry matte whereas oil paints will dry with a gloss that can be cut back with thinners but why bother since water based paints work so well,  and they are easy to work with, and clean up is a cinch.

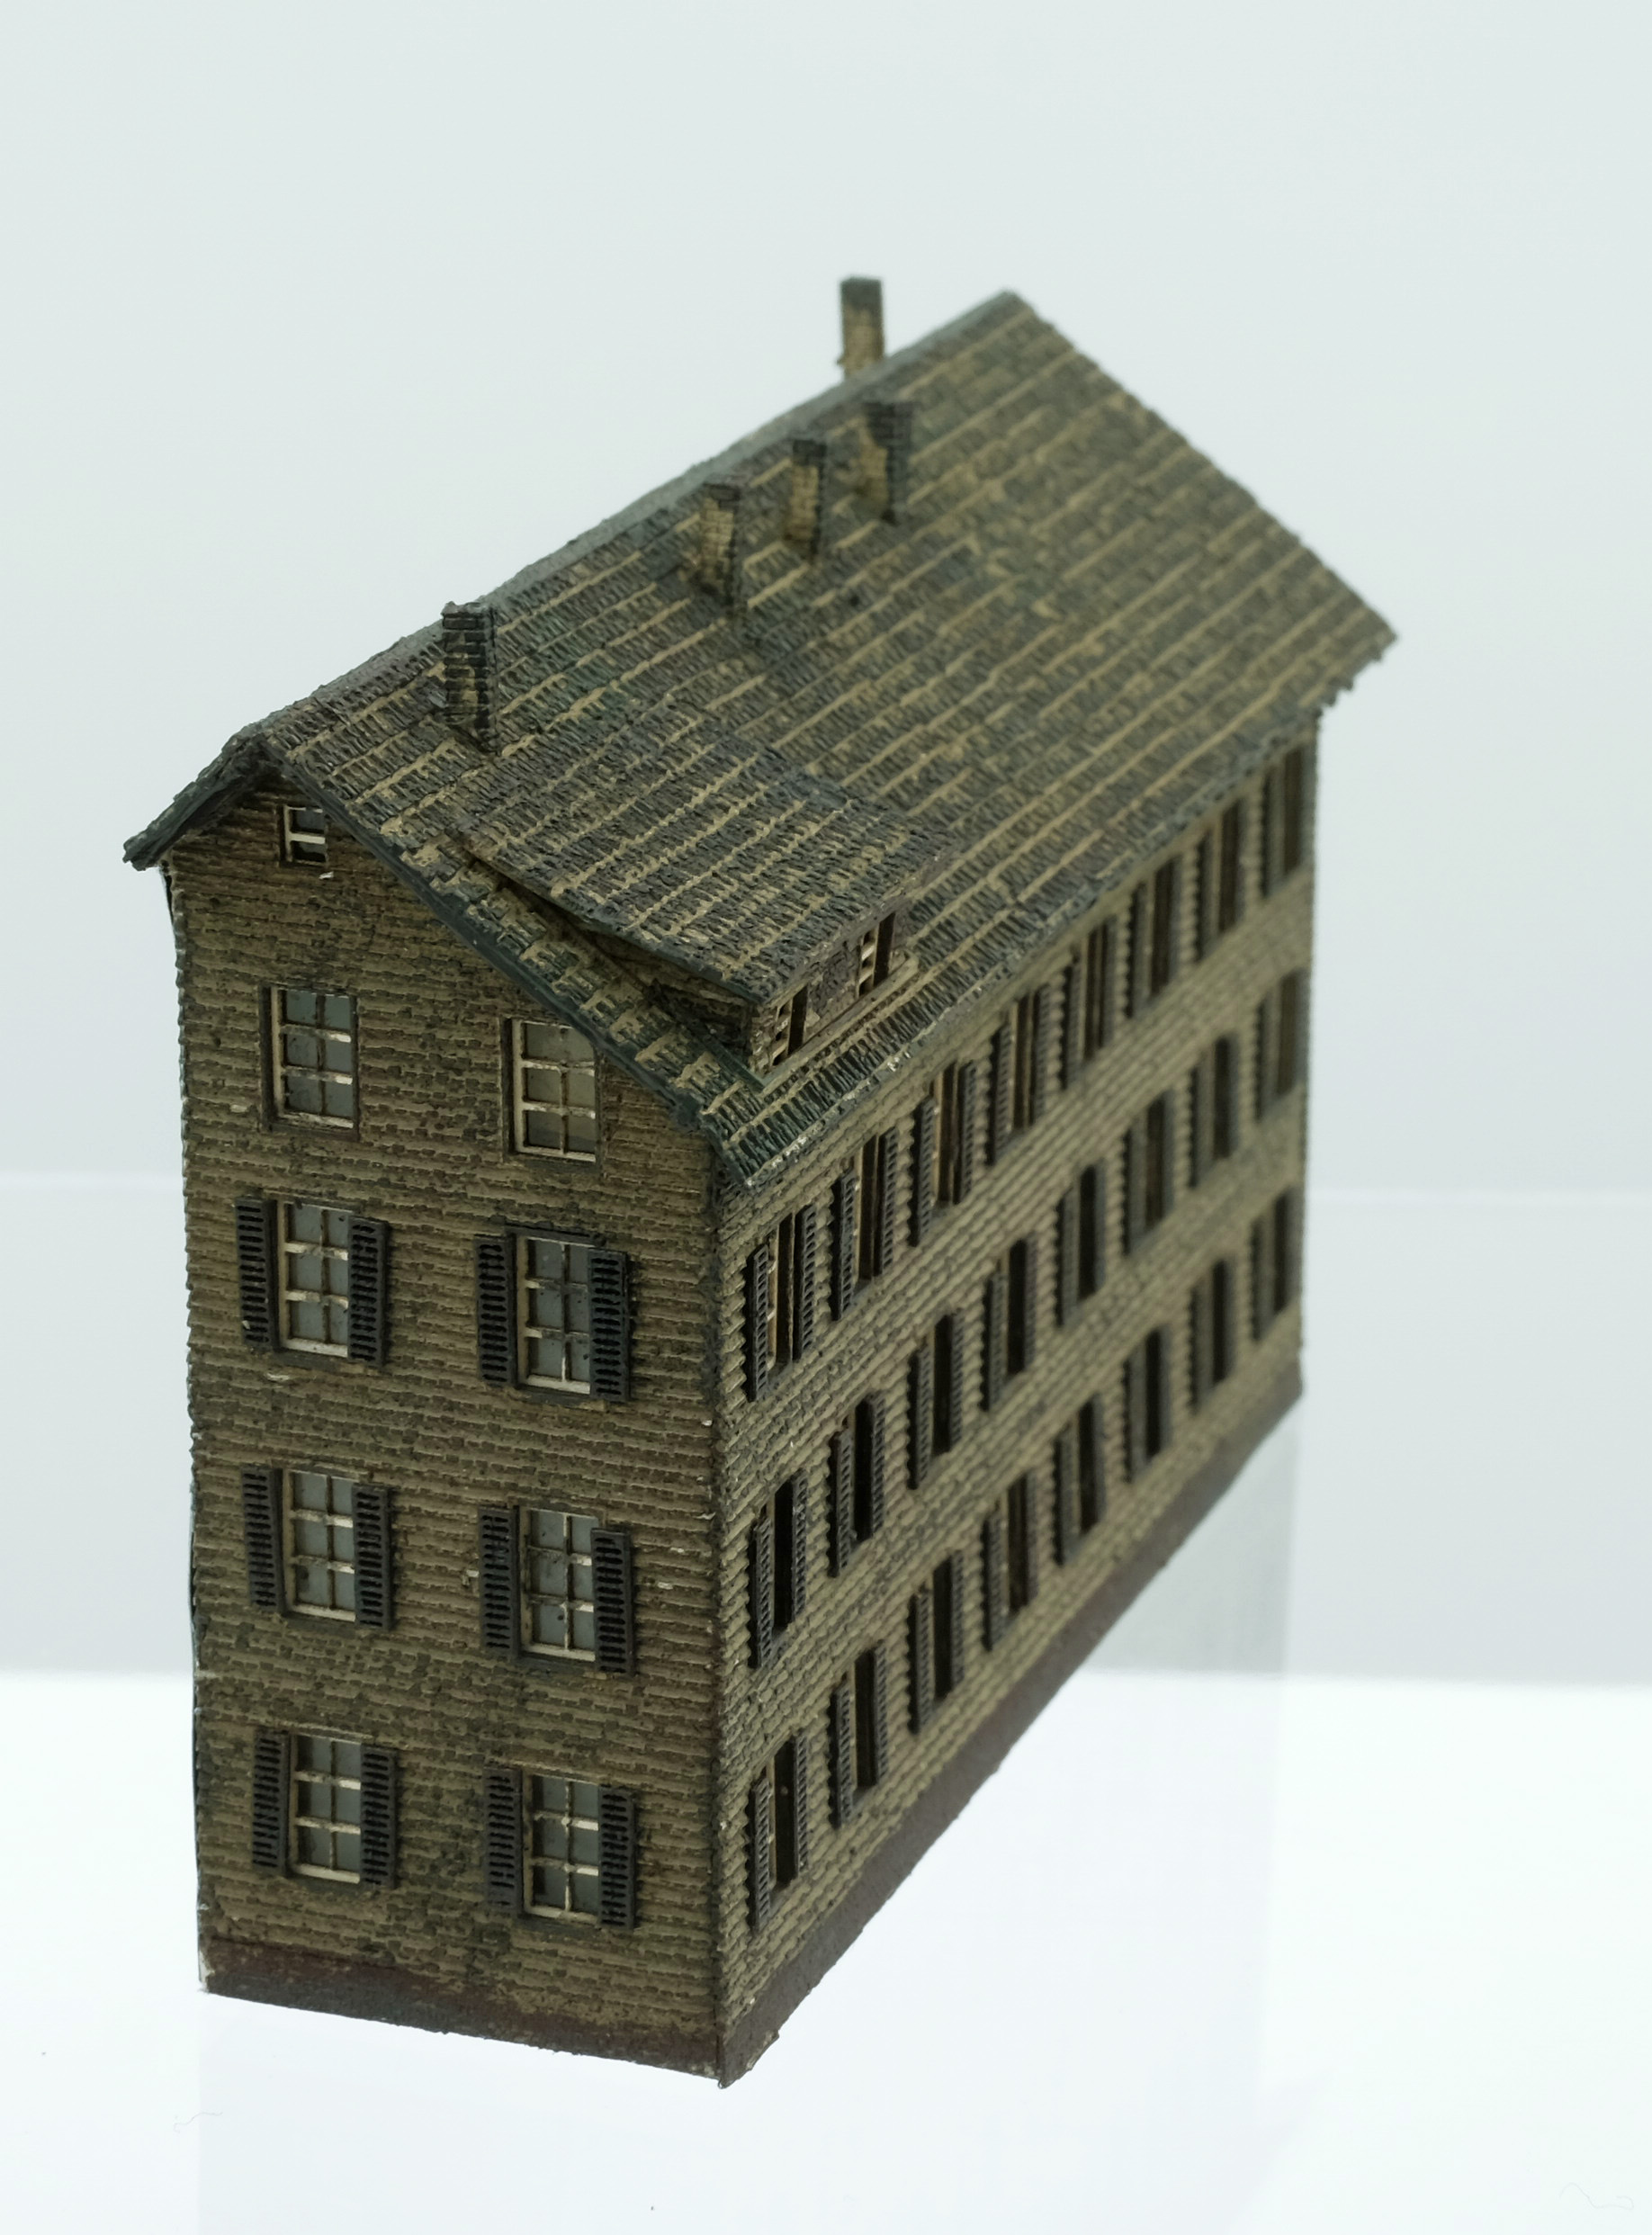
For this MBZ building I used a combination of four paints by Polly Scale and Modelmaster separately applied: Grimy Flat Black first to bring up details throughout the building, Roof Red to generally add a hint of color to foundation and ever so light touches to shutters and shadow areas under eaves and dormer, Vermont Green mixed with Pullman Green to give a subtle impression of moss on shake roof tiles, Pullman Green lightly applied throughout building for another color to add depth plus added to shadow areas and chimneys, lastly Grimy Flat Black to give uneven streaks to roof and chimney caps plus dirty up the window frames.

Before dry brushing:

After dry brushing:

Siding: Weathering is an individual thing and the amount is often times based on preference, two techniques for MBZ weathering are this companies painting kits and technique as well as traditional dry brush, but other techniques can be used included rubbing dry pigments into the paper and sealing with a light spritz of matte lacquer, literally blowing a puff in the air and walking the building into the mist, do not directly spray the building! Explore explore explore and remember to have fun!

Siding: If you have invested a small fortune in the premium railroad paints made by Polly Scale, Railroad Colors, Modelmaster Testors with the small glass bottle and metal cap here is something of value to mention. Eventually your water based paint will spill over the sides and cement the cap on, run the whole bottle under hot water for several minutes and the cap will free up!

Part 2 Bahnhof Dammtor build kit: Marklin 89793

Supplementing the Marklin Bahnhof Dammtor station kit is 89793 for the bridges and arcades and the prototypical presentation of the station and its elevated rails.

Overall 89793 is a good kit and far easier to assemble than the station kit, but it has two shortcomings due to relative incompleteness. First the arcades and shops provided are not enough to complete both sides of the approach, if you look at the marketing photos and compare them to the actual kit it is finished on one side only. Buying two kits will provide the missing parts and double your budget or you can limit access to that side of the layout which would otherwise spoil the illusion. The station kit provides detailing on both sides, why not this supplementary kit? Also the surface of the approach is unfinished as it is also with the station, but this is understandable, each of us will have our preferences on this topic, but the manufacturer could help with some guidance.

There are a series of parts tinted green (part #32) of a decorative nature that are illustrated in the instructions steps M + N. After researching this part of the Bahnhof Dammtor I was able to locate a photograph of the arcades with these decorative embellishments, they are used along the edges of the track approach each separated by masonry blocks. As can be deduced the kit does not include these sections instead the kit is designed for these sections to be glued together in a continuous line-up.

A busy web of traffic skirts around the station in Hamburg, whether you incorporate the prototypical roadways and markings or opt for a reduction of intersecting traffic patterns is up to you. In the prototype the four bridges cross over roadway on one end of the station before the four tracks reduce to two leading away from the station. On the opposite end of the station I believe the approach is less specific and a continuation of the same gradient of earthen construction. As more is learned I will post updates. Any helpful guidance from first hand witnesses is greatly appreciated as is always the case here at ZTrainsWeekly.com.

Instructions and parts make this a very good kit to go along with the station kit, my only word of caution is to hold off positioning/cementing the bridges until the track placement leading out of the station is determined, there is not much wriggle room for track orientation over the bridges so fine tuning is only possible if the bridges can be easily adjusted during installation on the layout.

Notes on instruction manual: Step I shows bridge supports constructed of 12 layers, but only 11 layers correctly comprise this assembly. Step J shows two large masonry columns in this step use the two beige ones. Step K shows two large masonry columns in this step use the two remaining ones which in this case will be red brick. Also part 73 needs to be trimmed, I found it to be too long. Before gluing this part match it up and see if you agree!

Detailing including architecture and bridges is stellar with this kit, the time consuming part is gluing the bridge supports onto the side of each one, this part of the construction seems endless, but it provides necessary detailing that would be missed without these parts. Plus the walkway and railing need these supports to be in place. Note: railings attach to the outside of supports/walkway. Also kudos to the manufacturer for including and designing parts that won’t be seen including bridge underlay girding!

Note: my kit included one parts sheet that was not cleanly but by the laser, in this case carefully help the cut with a new 9mm razor blade, don’t force the parts out of the sheet because the fine brick etchings will easily tear.

Siding: stay tuned and on the lookout for my next posts covering the following topics: MBZ build kits, laser cut kits: a comparison by various manufacturers, and glues for laser cut kits.

Bahnhof Dammtor build kit: Marklin 89792

The Bahnhof Dammtor station kit met with much fanfare when it was announced at the Nurmberg Toy Fair, it was announced in the New Items Brochure 2015 and currently available.

The Bahnhof Dammtor opened in 1903, it is still in operation today near Hamburg’s city center. Two platforms and four tracks support suburban, regional and long distance trains: one platform for S-Bahn and the other for regional and long distance. An architecturally important train station with walls of windows running parallel to the tracks thus allowing easy sightings of trains passing through the station.

Building the Bahnhof Dammtor in ‘Z’ is now possible with Marklin 89792 build kit. MKB Modelle designed and manufactured this kit along with others in the Marklin line-up. If you have some experience with their kits this one will revisit some of the same characteristics of their kits. This is a complex kit for the ambitious railroader, Marklin notes the build time is 50 hours. Building this kit is a time investment that I recommend spreading out over sessions of 2-3 hours to reduce fatigue and possible mistakes. Building and designing a kit of this size is an undertaking for any manufacturer and their attempt to recoup a profit a sizable achievement considering number of parts to design that must fit together plus material production of numerous laser cut parts. I built this kit quickly, and I made some mistakes that are avoidable. I already ordered a second kit that will combine what I learned from building it once, this posting I hope will help others too!

Two parts: 1. notes on instructions 2. parts

  1. My notes and recommendations are a supplement to the printed instructions included with the kit which are at times confusing and misleading. Steps B-C1: illustrates guide lines for platforms, my kit did not have guide lines these will need to be made before gluing platforms. Here are spacing measurements I used before attaching exterior panels: spacing for outer tracks 13/16 inches and spacing for two tracks between platforms is 1 5/8 inches. With a pencil make spacing lines to help guide gluing of platforms. Instructions show trimming platforms to align with ends of station leaving platforms untrimmed is more prototypical and will extend outside the station. Equal spacing of the platforms 1 inch outside building is okay, but if you will be using the bridges and arcades kit 89793 the platform will extend too far over the bridge approach therefore you may want to mount the platforms on that end flush to the end of the building thus allowing the platforms to extend 2 inches on other end of station building. Steps D-G: Take extra time with these steps making all parts level throughout, warped assembled sections of exterior walls will be difficult to glue to the foundation of this building later in the project. Special Note: window glazing is attached to windows at this point, use great care and precision to cut provided mylar just enough to glue it in place, the next step shows window detail panels for each window, these pieces need to be glued directly to framework (cardboard and plastic cannot be securely glued together), having overlapped the mylar slightly over the windows will be secured by cardboard window panels. Step F shows interior side of panels with attaching brick sections around windows. Take note of the illustration within the circle showing 1mm between these window panels, it also is the spacing needed to keep the slots in the framework exposed (later in the project the trusses are attached to these slots!). Step H-I2: glue entry portal panels together keeping bottom of parts flush to your work surface. Carefully examine illustrations in I1 and I2 and assemble first without glue to orientate yourself to these assembly steps. Note: illustrations within circles shows 1mm spacing for architectural detail 79 attached later in step K. Step J: it is no fun to precisely cut window glazing for 24 windows, but the more careful you are here will result with good results. Step K: part 59 is actually 61 on the parts sheet, part 24 does not show dark brown cap (part 27 which was assembled in step H), part 28a is part 33 from step H. Step L: part 59 is wrongly illustrated as part 61. Step M: illustrations show front side facing out, maybe glue parts after each is assembled provided you are using a fast setting glue like Elmers Wood Glue or Daige Rollataq (available at art supply stores). Instructions suggest window glazing is attached to outside of window framing, this is incorrect, window glazing for two small side windows is attached in step 0 (glazing is always attached on the interior sides of windows otherwise they would not look realistic). Step N: this is a straightforward part of instructions and careful use of tweezers will help make alignment of all parts easier. Note: glue only after parts in this illustration are assembled, glue can be applied to joints and in and around other parts you can access, that is enough. Noch’s new glue is perfect here: 61104 Laser Cut Adhesive available in the USA at none other than ZScaleHobo.com. Step 0: window glazing is attached to two small windows and central large window. A cool design feature here is the part that surrounds central window which is secured in place by the sliding vertical parts 126 thus holding the glazing flush to window. A little line of glue applied with toothpick around interior side of window/door entries is enough here for parts 57 (glazing will already be attached to these parts from step J. Step R: parts 124 and 125 that line the entry ways will be easier to install first before outer layers. Step S: illustration shows exterior side of train entry. Note: this is a tricky step, there are 4 parts that are laminated together without a lot of room for glue. Parts assemble in this order: 85, glazing, 86, and 78. Part 78 is a delicate framework that attaches to part 86 along with two tiny complementary parts, little drops of glue and a deep breath along with tweezers and good set of magnifying glasses (magnifying glasses are always highly recommended for laser cut buildings). A cat-walk is also part of this assembly, assemble parts 82 and 83 before gluing otherwise the paper fibers of these parts will expand and make assembly very difficult. A finish strip is added as the last step to hide the assembly slots. Step T-V: this is were the building starts to come together, but there is still much work ahead. Each side of building is comprised of three panels: start with the center aligning it with the unfortunate seam in the base followed by both side panels that fit together with seamlessly if your panels are without warp! Trusses fit into those exposed slots between interior window detail panels, they will bow slightly but no worries (trusses are made of lightweight card-stock, careful not to press into place with too much pressure). These two steps take time maybe attach panels and end units in one session and trusses in another. Step V: truss framework is completed with long running trusses that run length of station, these are comprised in half sections that come together on a special center truss part 70. Best to study the illustrations and parts before assembly. Trusses match up with slots and any bow will be eliminated during step U. Apply small drops of glue to truss joints otherwise they may slip out of place, plus this will be the only time the trusses are glued following my further instructions. Step W: roof sheathing is comprised of two layers: brown under-lay and outer gray sheeting. These two layers are also comprised of three pieces each: two small ends and one large center section. At this point the beautiful trusses are exposed, consider before attaching roof if you want to expose all or part of the trusses by not attaching the roof in its entirety. I am not interested in leaving the trusses exposed but certain museum models often do and it could be interesting with this building kit. Attaching the roof is a significant step and nail biting. Roof sheathing is beautifully colored but constructed of very very lightweight paper, there is sweep in the roof design thereby requiring material that easily contours to the roof requirements, but there are also disadvantages to this material: it is highly absorbent to water based glues which leads to ripples in the surface to avoid this I did not glue sheathing to trusses instead I glued sheathing to outer edges of building starting with one side first and allowing glue to dry. I then pulled the sheathing sheets over to the the other side and glued in place along with ends of building. Roof sheathing easily ripples so be very careful getting too much glue on it!!! Step X : half domes over main entrance requires bending roofing material around a radius, I glued only the building edges and a couple of drops where it contacts the roof. For the top layer I glued it only to the building edges. Step Y: nearing the end of the project includes the assembly of a long vent, it too has the same lightweight paper as roof and gingerly applying glue dots to framework is better than too much glue, maybe glue top layer along edges only, but maybe underlay should be glued similarly with glue on edges and ends only just to keep it from buckling. Cutting a hole in the roof for the vent maybe more prototypical, but avoid this exercise because the roof sheathing won’t go on well at all. At this point a lot of money and time has been invested so please do not modify the kit at this point unless you are well experienced with such things and can overcome a big set-back. *If I am able to come up with a better roof solution when I build this for a second time I will share that advice to this post, but as of this writing I am partial to gluing the edges only and allowing the trusses to be free from anchoring to the roof. Parts 152 are roofing for the entry ways, these parts are hard to bend therefore I suggest wetting slightly bending to shape and allowing to dry before gluing in place, they can also be finished with black construction paper to at least look less distracting than unfinished cardboard, but you be the judge. Step Z: not a step at all but a page of recognition that you made it through the kit. If you made some mistakes don’t fret, kits of this nature and size we usually build once thus making for an unavoidable learning curve. I hope my notes are clear and that they help to avoid some of the mistakes I made.
  2. Parts are many and varied in design and material, here is my list of parts that deserve extra care and caution with starting from beginning to end: Parts A5 do not have alignment guidelines for platforms, you will need to draw these lines to precisely make even room for the 4 tracks that will run through the station. If you plan to add the 89793 arcade and bridges I recommend waiting to cement the bridges until you know where the tracks are coming out of the station, bridges can be moved in accord with the station tracks. Parts 6/7 are laminated to parts 9/10 for one platform thus there are two of each of these parts to comprise two platforms. Laminating thick card-stock will result in curled platforms unless . these are placed on a flat surface with weights for 24 hours, I have an artist dry-mount press that I use. Rolling with rubber roller available from an art supply shop will help press the sheets together. The instructions indicate gluing directly to the foundation one layer at a time, this may work okay, but I opted for the completing the platforms and then gluing because there is a final finish layer of paper that is glued and bent around the edges, I found it easier to prep the edges of the platform with a nail file and then attaching the paper before gluing to station foundation. First criticism of this kit is that the stairwells are not finished thus they are simply openings in the platforms. If you can fashion railing around these openings I would highly recommend it. And add some black construction paper to the base of these openings will at least give some depth. Parts 13 and 15 are important, I highly recommend studying the illustrations to determine the correct orientation of these parts. And keep them straight! Part 33 is a small decorative facade detail but there are 12 of them, if you use tweezers be careful that the legs of this part do not separate too much or two little, they should align with the edges of the building they attach too. Part 65 is a window in the center portion of station, there are four total in the construction of the building, these parts are installed before part 108 is attached the building! Likewise parts 63 install before parts 109. Part 78 is found as the outer layer of station ends of which there are two, this part goes on the outside of the building.

Special Note: The first level of the station comprises numerous shop fronts, because of the design of the building some shops have views of seams and all have views of unfinished cardboard, I recommend lining the back walls of each shop with dark gray construction paper to even out the interior details and at the very least making for less distraction. I also used Noch self adhesive gray cobble in Z for going between tracks inside the station. After completing the station it will be next to impossible to clean to tracks and any loose prototypical ballast will be a nightmare to remove.

I highly recommend this station which further advances modeling in Z and the advantage Z’ers have over other gauges with prototypical and accurate scaling in a reasonable amount of space.

Siding: Marklin has released many Hamburg trains in Z making this station a must for those who are after prototypical accuracy.

Repair Notes: Marklin 88992 Swiss class A3/5 express locomotive

Marklin 88992

Marklin 81035

Note: photo 1 depicts the 88992 loco and tender in Marklin’s original marketing literature, photos 2 and 3 depict the train set 81035. The original Marklin photograph varies greatly from the actual loco: paint finish not as glossy, side rods not as dark and wheel/spoke design more typical of other steam locos produced by Marklin in ‘Z’.


A ‘One Time Series’ locomotive from 2005 is the Swiss Federal Railways A 3/5 express locomotive based on the 4 cylinder compound prototype from Era II. Marklin released the locomotive with tender as item number 88992, they also released the train set 81035 in 2007 with this loco and tender plus 3 coaches called by Marklin “The Old Timer Train” in celebration of 125 years of the Gotthard Line. Both items are very hard to find for sale, but if you model Swiss trains and find one it might be of interest for your railroad. Having the luck to find one might come with some disappointment with running performance ‘out of the box’ which is the topic of this post. I own both the train set and the loco, each was purchased new, but the loco is a recent acquisition, it arrived with working headlamps and ‘HOS’ (hardened oil syndrome). The locomotive was dead on arrival which also indicated it was never run and the original Marklin oil was dried up. Marklin oil over time dries out, it acts like glue in this condition. Does it always happen? No! Marklin may have varied the oil used during assembly so sometimes there is HOS and sometimes no evidence of HOS with older locomotives.

More than likely 88992 will have HOS, one dealer I have seen is selling the locomotive with replaced wheel sets leading me to believe the original was traded out because it was mucked up, thus making it easier to trade out the chassis than making this rather tricky repair.

Removing HOS from this loco presents a few problems that are easily overcome with those with experience. First the loco has to be fully taken apart including un-soldering the leads to remove motor. The leads will spring away from motor which is easy at this stage but more difficult when re-soldering later in the repair. The problem which is relatively unique for this loco design are two gears that are attached directly to the frame, they are not easy to remove, but they don’t need to be removed. The gears in my loco were solidly stuck in place, I used ‘Original Windex’ (blue) and applied it with a dropper to both gears. Eventually the mild solvent loosened the gears that I worked back and forth with a toothpick until they were freely moving. At this point I dropped a few more drips of Windex and let the frame sit. When the Windex appeared to be dry I reattached the motor and ran it with a fresh oiling with synthetic plastic compatible ‘Z’ gauge lite oil. At this point the loco can be reassembled and tested on the track.

In summary: 2 frame mounted gears frozen in place by old dried oil will more than likely be the cause of this loco not working, removing the hardened oil will bring success!

Siding: If your headlamp works but the motor is silent chances are you have HOS, overly testing the loco in this condition will do no good for the motor.

Gottard Tunnel: 1872 + Marklin’s Swiss Steam Loco 88992 + 81035

The Gottard Tunnel opened to freight trains January 1, 1882 after 10 years of construction and deaths of 200 workers. It was the longest tunnel ever built when it opened with a total length of 9.322 miles. Used by steam trains until 1920 when it was electrified the private railway Gotthardbahn operated the tunnel until it was incorporated with the Swiss Federal Railways in 1909. The proposal for such a tunnel as part of the project to link North Italy and South Germany was first proposed in 1848, but the Gottard was a difficult tunnel to build with construction starting in 1872, workers used the recently invented dynamite (1867), pickax and shovel. The pace was slow at just under 5 meters a day for a proposed budget of 2830 Swiss  Francs per meter but that cost would increase by 11%. The lives it cost included the Swiss engineer Louis Favre who overseeing the project died of a heart attack inside the tunnel.

The Gotthard Tunnel one year before completion:

The Gottard Tunnel in 1890 as recorded by the Italian photographer Giorgio Sommer (Napoli) who was well known for his photographs of Switzerland’s geological formations:

Postcard view from 1900:

Postcard view from 1900:

Today with view from Goschenen station platform:

Siding: Marklin produced two Swiss early steam locomotives who’s prototypes would have run through the Gotthard at the beginning of the last century: 88992 + 81035.

88992 – Serie A 3/5 Era II loco with builder number 613 and paired with type T 20 tender. One Time Series 2005.

81035 – “Swiss Old Timer Train” Era I loco with builder’s number 605 paired with type T 21.5 tender with three coaches. One Time Series 2007.


DR Class 01 Steam Locomotive

The Class 01 Express Steam Locomotive awaits passengers one morning in the summer of 1968. The older design baggage car and “Thunderbox” coaches were still used at this time by the DR at reduced speeds, the 01 was capable of 80mph, this photograph carries an inscription that the locomotive operated at 60 km/hr (37mph) in the Hornbach region. This Ostdeutschland BR 01 is operating accordingly in East Germany, the photograph’s inscription records the location as Hornbach. Operating number plaque indicates this locomotive to be 01 527, it varies in appearance to the DB class 01’s with the appearance of a continuous cover for the dome which gives evidence that this was one of 35 locomotives rebuilt in 1962 by the Reichsbahn Repair shop in Meiningen, the rebuild included Witte smoke deflectors, new cab and boiler positioned higher on the frame of the locomotive. My research does not verify the disposition of this locomotive so presumably it was scrapped, but the class 01’s operated for the DR until 1982, their service displaced with the advent of the diesel ‘Ludmilla’ introduced in the 1970’s. Marklin has not produced the DR version of the class 01 in Z, but maybe it will be a further development of those so far offered for DB: 88010 (Insider) and 88011, we will wait to see if it is included in the ambitious plans at Marklin.

Siding: The Soviet built ‘Ludmilla’ diesel locomotive was introduced to the DR in the 1970’s thus eventually ending the long career of the class 01 locomotives. Marklin’s last version of the Ludmilla in Z was 88134 based on the class 132 prototype from 1982.

Marklin 88134

German BR 01 Express Locomotive: DB’s BR 01 154

The inscription on the verso side of this photograph gives the place and date as “In Nuremberg 1966.” Seven years later this class of locomotive would be retired from service for the DB, this one in 1968. As a side note: Class 01’s continued service until 1982 for the DR. Built starting in 1926 the BR 01 express steam locomotive was in service for many years, this one being BR 01 154 built during the time-frame 1930-31. In 1950-51 this locomotive along with 4 others were rebuilt with Witte smoke deflectors as can be seen in the photograph along with several improvements including Heinl mixer preheater, turbo pump and combustion chambers in the boilers. The rather clear representation of the tender was one of three types T 30, T 32 or T 34 varying by length to fit a particular turntable being used. The class 01 steam locomotive was the first to be considered “standardized” meaning parts with exact specifications could be used to repair this locomotive throughout Germany.

Inside the cab:

Specs for this rebuilt locomotive:

Service Weight: 109.3 long tons/ 122.5 short tons

Adhesive Weight: 59.1 long tons/ 66.1 short tons

Axle Load: 19.7 long tons/ 22 short tons

Power: 2417 hp

Grate Area: 46.4 square feet

Superheater Area: 1022.6 square feet

Resource: DRG Class 01 Wikipedia Page

The uniformed train driver poses next to his locomotive as his fireman peers through a cab window, his briefcase presumably contains his log and maintenance checklist. Standing along the rails of a gantry crane the train driver waits to board the locomotive which is in line to receive coal and water. A few chunks of coal outside the coal bunker suggests it was just loaded along with water as evidenced in the run off near the fill hatch. The train driver was more than the operator of the locomotive, he was responsible for the well being of the passengers and locomotive, following safety and maintenance protocols he was operating a locomotive of such power it could reach speeds upwards of 80 miles an hour. Interpreting signals on the right of way was assured by this well trained individual who could operate a steam train and deliver its passengers in accordance with printed schedules: safe and timely. Physical demands of the job cannot be overstated, this was not an easy way to make a living. When this photograph was made the locomotive and train driver were of similar age, two years later the locomotive would be retired, and the trainman with his specialized skills may have continued operating steam locos in this class for the DB until 1973.

Marklin has produced two BR 01’s in ‘Z’ since 2012: 88010 and 88011. Released in 2012, Marklin 88010 was the Insider Model for that year as BR 001 of the DB with operating number 001 161-9 based on the Era IV prototype. Two years later the 88011 was released based on an Era III prototype with operating number 01 147. Both locomotives represent the new generation of steam locos by Marklin with superb detailing of the operating equipment and side rods.

88010

88011

Both locomotives look virtually alike, the distinguishing feature is the operating numbers.

Siding: a short ton is 2000 pounds and commonly called a ‘ton’ in the United States whereas a long ton is 12% larger, it is referred to also as ‘Imperial Ton.”

Siding: In 1968 Germany reclassified their locomotives, steam locomotives at this time were given an extra ‘0’ thus the Marklin 88010 is a BR 001.


Faller 282780: Town House

Just hitting the United States market by way of Walthers are two new laser cut card multi story town houses: 282780 “Town House” and 282781 “Provincial Houses.” This post concerns 282780, my dealer just notified me that my pre-order for 282781 is in, its posting will follow.

What to do when modeling an urban or provincial scene after having committed to laser cut card stock building kits, so far the choices have been limited to some very good rural buildings, and hopefully more will follow with the release of these kits.

This Faller kit features good detail including carved sandstone ornamentation, silver foil facade, dentil molding, and window masking unique to Faller. Challenges with this kit include many small delicate parts for the facade, construction of chimneys, and multi-part construction of dormers.

In the days before LED’s I would not spend a lot of time discussing the merits of the window masking, I found it too dense to light with a proper bulb without starting a fire. I exaggerate, but success was very limited with what was available before to properly light these structures. Today LED’s are available for lighting Z scale buildings with a great success, they are cool, long lasting (10,000 hours), and priced right. Plus the illumination is adjusted with individual dimmers controls. Everything gets lit with Faller’s window masking, but this can be altered by placing electric tape over individual windows you do not want to light. Masking material is provided if you want to light the dormers, you will also need to cut the top of the masking material before inserting into building. I have built three of these buildings, and I plan to build at least three more, I will vary the lit window effect with those buildings by lighting maybe just one or two floors or variations between what is lit on the facade side versus the back side of building. It is also a possibility to install the buildings close together for a realistic look.

Maybe this should not be your first laser cut card stock building, but it is easy for those with a couple of other buildings under their belt.

American Scenics Plug-In LED System includes many options and choices. Starter kit includes a couple of led’s, hub, and transformer, it is the best value.

The finished 282780 assembled with three kits:

Siding: several companies have cleverly designed their building kits for realistic lighting: Faller with window masking and Archistories with partition walls. If you haven’t tried Archistories building kits you are missing out on something special, they are available in the United States at http://www.zscalemonster.com and http://zscalehobo.com.

“All Is Not Lost”: 82540- Sugar Beet Harvest gets a fix

I was excited to get to the recent release of 82540, it came with cars of a superlative quality and as an extra bonus a card-stock build kit for beet loading machine of the prototype installed along a railway siding in Germany. Just the other day I wrote about the revelation of getting this freight set and building the kit, I made a few mistakes with the beet loader kit that were easy to rectify hence the title of this post. All is not lost many times with railroading, we modelers figure out a way to modify and fix problems in design or construction and sometimes the reconfiguring is big and sometimes small, but it is a good process and rewarding just the same.

I came across three excellent photographs on the web of the prototype for the build kit that gave me a better idea how to fix the loading area of the machine, the prototype features a angled sides for the beet loading which form a tub. I decided to go with this and add two strips that accentuate this design feature of the prototype using parts saved from the kit. With cardstock kits we are left with numerous parts that can be incorporated later so I save everything for future projects. My repair worked out great and I am happy with the result, weathering with dirt will follow and even some small areas of rust. As for the prototype it is a small machine built to a permanent foundation along a rail siding. And as a difference with the kit the roofing sheathing is translucent to block rain and sun, the build kit’s roof is opaque. The prototype sees a fair amount of use therefore I suggest heavy weathering is appropriate with dirt, grime and even rust along areas the have wear.


As can be seen in these excellent photographs the new build kit included with 82540 is very accurate, but you may pull your hair out building it due to the small parts. Nimble fingers are your best tools along with those all important magnifying goggles.

Note: I am researching the photo credits for these three excellent photographs which I found during a Google search for this beet loader. For research and educational purposes these photographs fully illustrate the scale, location, and construction of this specialty rail siding machine. The photographer will receive photo credit when I locate them.

Siding: Manufacturers of card stock kits recommend wood glues for assembly, but common white glue can also be added to that list which is mildly acidic. I use PVA (poly vinyl acetate) which has neutral ph, it is available at all art supply stores. I like PVA for its consistency and thickness, plus it sets up very quickly, and the neutral ph guarantees no future discoloration of paper.

Repair Notes: mallet locos 88290-88294

A very interesting Marklin Z loco of the ‘mallet’ type was introduced in 2004 as Insider Model 88290.

The class 96 loco has been released in 5 versions to this point in time, but Marklin did not limit the release of a ‘mallet’ type loco to this class, they also introduced the class 53 in 2007 as Insider Model 88053.

What characterizes a mallet locomotive is first an articulated frame along with two independent wheel sets. Invented by the Swiss engineer Anatole Mallet this type of locomotive was highly successful in mountain railways, and in the United States this loco type was used in coal trains. The articulated frame allowed for negotiating sharp turns while high and low pressure steam powered two sets of driving wheels. The front set of driving wheels form the ‘Bissell’ truck which received low pressure steam through a receiver after high pressure steam powered the second set of driving wheels first. Variations between European and American ‘mallet’ locos follow the basic design principle, but each varies by other factors including length and power. Marklin’s two mallet designs represent very large and powerful locos one of which never existed beyond blueprints as is the case with versions of the class 53: 88053, 88054, and 88055 (pictured).

To repair the mallet locos of class 96 some patience and practical experience in the repair of mini-club steam locos is required. Marklin Z steam locos have one set of driving wheels, the mallets have two sets and therefore one must treat each as independent by repairing one at a time. These are complicated locos, but they are so well designed that taking one apart and reassembling is relatively easy for those with some experience repairing locos with side rods. Note: wheels must be correctly orientated to allow free movement of side rods, side rods bow out when wheel sets are improperly installed in all locos with side rods.

This post came about rather by accident, I recently purchased an 88291 thereby completing my collection of this type loco, but it arrived with hardened oil syndrome which can be expected with dealer old stock. Tell tale signs of hardened oil syndrome are lights that work without a hum of motor or movement of wheels. The oil Marklin uses will harden over time which is compounded by improper storage. Hardened oil gums up the gears not allowing them to move, it looks like a crust, but it can also be sticky to the touch.

Note: white gunk near center of photo

To remove hardened oil a mild solvent is required, toothpicks work to loosen up crustiness and soaking NON PAINTED surfaces in “Original Windex” (blue). Improperly storing locos includes side down, they should always be stored wheels down. The one I just received was one such example of a loco stored long term on its side: hardened oil pooled on one side throughout gears and truck housings.

One can see the appearance of hardened oil as white crust, it can otherwise be fluid or congealed as a sticky substance all in the same loco: weird!

One gear is sometimes the culprit at least with this example. Part #226 646 is an interesting gear that sits mounted on a post cast into each truck frame of this loco, thus two are included in this design.

Note: gear can be seen mounted inside truck frame in two photos with yellow background

I have come across this gear on more than one occasion, Marklin’s class E 94 and 194 locos including all versions have this same gear in their design so repairing this loco is a good primer for repairing those. Time and time again it has been proven to me that if the German “krocodil” isn’t moving this gear is completely stuck due to hardened oil. Very careful attention needs to be applied to wriggle off this gear from its post, I use a toothpick over a dish to catch the part.

The transmission in this loco is very long with two worm gears, it comprises two extensions attached to the the tip of the motor (226 631).

So many parts that are required to move in the smallest space comprise a flawless design that includes a sensible tear-down and reassembly design.

Reassembly includes close adherents to correct order of things: no matter loco type small connecting gears always go in truck frame first followed by driving wheels.

Photo shows one truck’s correct assembly without oil pan attached. Note the two connecting gears which are standard with all locos in Marklin ‘Z’, and because they are small it is a good part to have spares of (part #226 645). Coupler and spring are not illustrated in photo, but they would be located on the right side. Side rods slide into black housing and only work one way: side rods of the third pair of wheels are orientated correctly in photo to allow correct distances in the truck mount for all gears. After coupler and spring are placed into their mount the oil pan slides over coupler end, and it is attached by a single screw.

It is always a good idea to keep an inventory of spare parts even though you may never need them because we are talking about the brilliant engineering and manufacturing by Marklin. That being said the motor for this series of locos is part #226 631, it is soldered directly to the pick-ups and solidly held in place to operate the very long transmission.

After each truck is cleaned, oiled and reassembled test it to make sure all gears move freely with the retaining pin and nylon gear installed too! Note: the nylon gear comprises two sets of teeth, one set engages with the worm gears on the transmission and the second is small running on one side of the nylon gear and engages with the post mounted gear previously mentioned. Recommendation: the nylon gear is another part to keep spares of, it is part #223 493.

Last note: if you know the loco is new and never run. And you have the loco taken apart, this maybe a good time to break in the motor and brushes independent of the motor’s engagement with the gears. Break-in: slow speed followed by medium speed, followed by high speed, and then reverse order. About 5 minutes of varying speeds will do.

Good luck and have fun!

Siding: required tools for repairing Marklin Z locos: pliers with micro tips, magnifying goggles, set of jewelers screwdrivers, foam work cradle, dish for holding parts, and guitar picks can be used to help remove plastic shells or shells without retaining screws.